Introduction
Congratulations, you made it to the last lesson in this tutorial.
This time you'll learn how to implement the task processing pattern, but in such a way that the system itself is performing the work.
As stated in the previous lesson, software does exist to support the day to day activities performed by humans.
However, when the conditions for executing these tasks are wellknown, then the system can perform them on behalf of the user.
This has the additional benefit that the user cannot forget to perform the tasks in a timely manner.
In this final lesson, you will:
- Learn when to use this pattern.
- Learn how to implement this pattern in your system.
- Have finalized the e-commerce business process.
When to use Automated Task Processing
Task processing is the simple act of looking at a set of data and then decide what needs to be done with it by invoking a command.
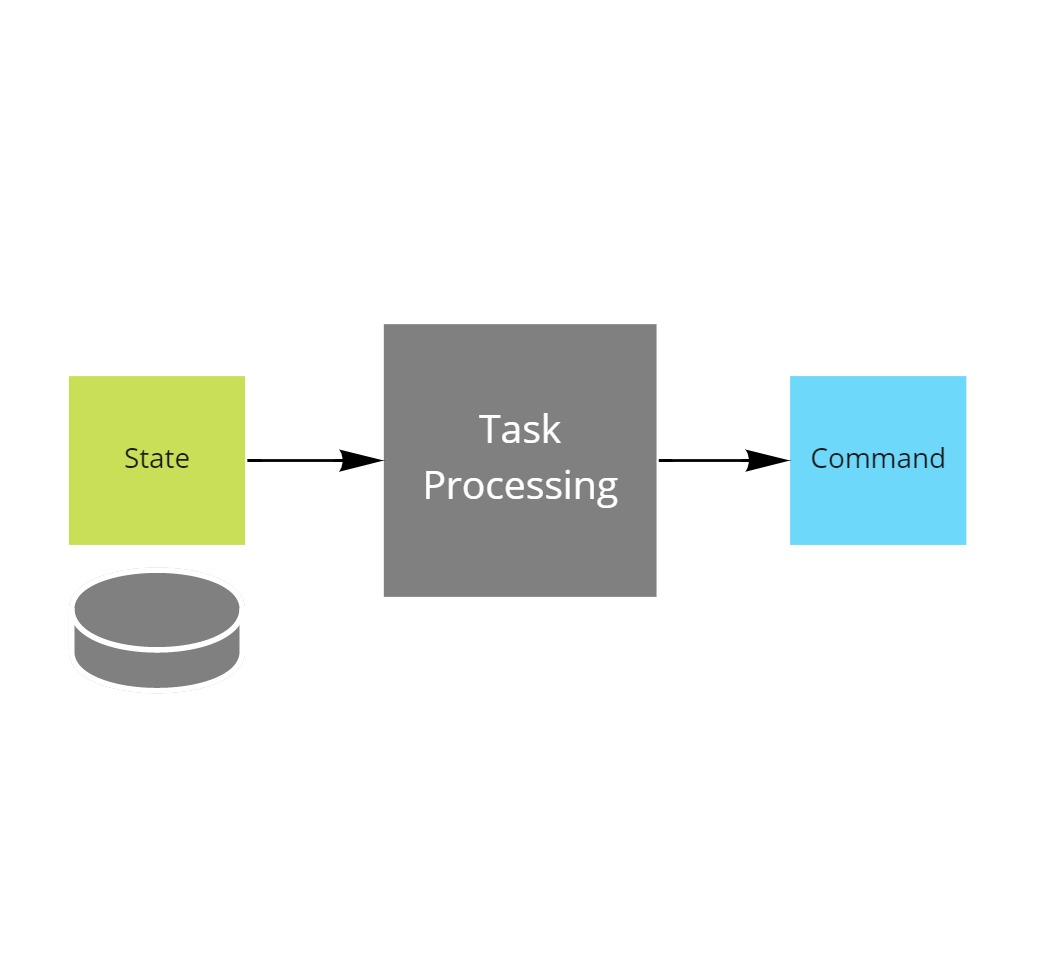
Automated task processing is a version of this pattern where a software process is continuously performing a query on that set of data in order to determine whether it is time to invoke the command.
Use this pattern every time an action needs to be taken
- automatically
- in the future
- when the conditions are fulfilled
Identifying the need for automated task processing
Automated task processing is usually required when side effects need to occur, in reaction to a user event, but the conditions for that side effect may not be immediatelly fulfilled.
Let's illustrate this with an example from the e-commerce flow.
A buyer would assume to receive a confirmation email after a sales order got confirmed.
But to comply with certain compliance regulations, such as the GDPR, companies need to ask their users for granular consent and provide them ways to control their notification preferences.
Which implies that the conditions for sending that confirmation mail may or may not be fulfilled at some point in the future.
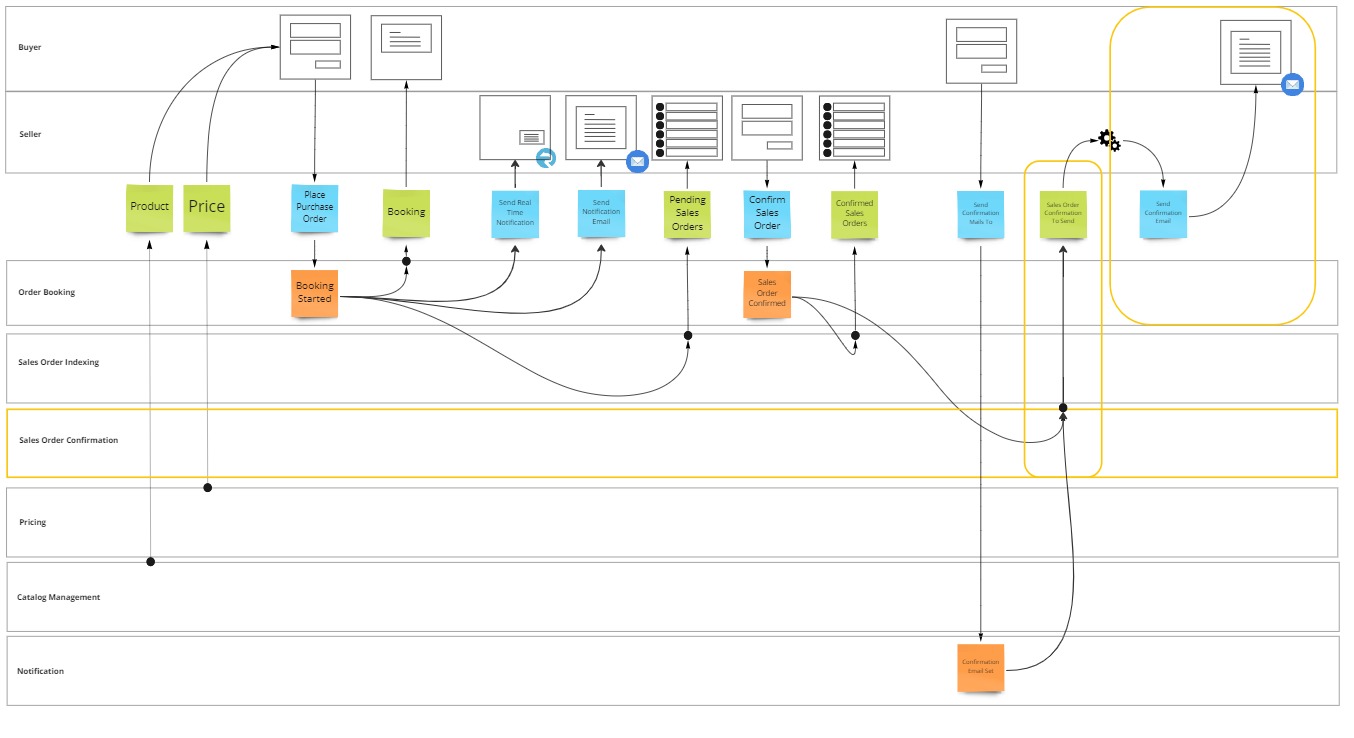
And of course, you don't want a human to be watching this list of confirmation mails to be sent on a fulltime basis, so you automate it...
Implementing automated task processing
As usual throughout this series, you can pick up the codebase from where you left it last time, it's in 10 manual task processing of the learning path reference repository.
Implementing the automated task processing pattern boils down to doing these three things
- Querying a database for tasks that can be executed upon.
- Invoke a command based on the retrieved data.
- Mark the task as done (or delete it).
Querying a database for tasks that can be executed upon
To be able to query a database, you need to set up the database and its tables first.
In lesson 1 of this tutorial, you should already have set up an azure database instance.
Create database tables
You use the azure portal to log into the database and create two database tables.
The first table is intended to contain the sales order confirmation emails that need to be sent out.
CREATE TABLE SalesOrderConfirmations (
    [OrderId] nvarchar(255),
    [BuyerId] nvarchar(255),
    [SenderEmailAddress] nvarchar(255),
    [EmailSubject] nvarchar(255),
    [EmailBody] nvarchar(255),
    [Status] nvarchar(255),
    CONSTRAINT PK_SalesOrderConfirmations PRIMARY KEY (O[rderId])
);
While the second will contain the buyer's notification preferences
CREATE TABLE NotificationPreferences (
    [BuyerId] nvarchar(255),
    [EmailAddress] nvarchar(255),
    CONSTRAINT PK_NotificationPreferences PRIMARY KEY ([BuyerId])
);
Querying the tasks
By performing an INNER JOIN query on the BuyerId, and filtering the set on Pending status, you are now able to identify which sales order confirmations are to be sent out.
SELECT TOP(1) [dbo].[SalesOrderConfirmations].*, [dbo].[NotificicationPreferences].[EmailAddress] as BuyerEmailAddress
FROM [dbo].[SalesOrderConfirmations]
INNER JOIN [dbo].[NotificicationPreferences] on [dbo].[SalesOrderConfirmations].[BuyerId] = [dbo].[NotificicationPreferences].[BuyerId]
WHERE [dbo].[SalesOrderConfirmations].[Status] = 'Pending')
To prevent a task being picked up by multiple instances in parallel, you need to ensure that the status changes to Processing at the same time that the task is queried.
This can be achieved with the WITH UPDATE OUTPUT sql statement.
WITH task AS (
    SELECT TOP(1) [dbo].[SalesOrderConfirmations].*, [dbo].[NotificicationPreferences].EmailAddress as BuyerEmailAddress
    FROM [dbo].[SalesOrderConfirmations]
	INNER JOIN [dbo].[NotificicationPreferences] on [dbo].[SalesOrderConfirmations].[BuyerId] = [dbo].[NotificicationPreferences].[BuyerId]
	WHERE [dbo].[SalesOrderConfirmations].[Status] = 'Pending')
UPDATE task
SET [Status] = 'Processing'
OUTPUT
    deleted.OrderId,
    deleted.BuyerId,
    deleted.SenderEmailAddress,
    deleted.BuyerEmailAddress,
    deleted.EmailSubject,
    deleted.EmailBody,
	inserted.Status;
The WITH statement assigns the output of the select query to a variable named task.
The UPDATE statement updates the Status property of the row represented by task.
And OUTPUT composes the result set from data in the original record deleted or the new record inserted.
Marking the tasks as done
When processing is done, the record's status needs to be updated to reflect the outcome.
You achieve this by using an update statement to set the status.
UPDATE [dbo].[SalesOrderConfirmations] SET[Status] = @status Where [OrderId] = @orderId;
Invoke a command based on the retrieved data
To automatically invoke a command when all the data becomes available, you will need to run the above queries on a regular basis or even continuously.
The best way to do this is by running a BackgroundService in the worker host.
Create background service
So you create your background service by adding a new class called ConfirmationMailWorker and inherit it from BackgroundService.
You are required to override the ExecuteAsync method, in which you can perform long running work, such as a near infinite while loop until cancellation is requested.
Inside that while loop you call the processor.
public class ConfirmationMailWorker : BackgroundService
{
    private readonly ILogger<ConfirmationMailWorker> logger;
    private readonly SendAvailableConfirmationMails processor;

    public ConfirmationMailWorker(SendAvailableConfirmationMails processor, ILogger<ConfirmationMailWorker> logger = null!)
    {
        this.logger = logger;
        this.processor = processor;
    }

    protected override async Task ExecuteAsync(CancellationToken stoppingToken)
    {
        try
        {
            while (!stoppingToken.IsCancellationRequested)
            {
                await processor.ProcessAsync(stoppingToken);
            }
        }
        catch (Exception ex)
        {
            logger?.LogError(ex, "{Message}", ex.Message);
        }
    }
}
To enable this background service, you add it to the service collection as a hosted service in program.cs.
services.AddHostedService<ConfirmationMailWorker>();
Encapsulate task processing
Inside that processor you first load a confirmation email that is available for processing.
Followed by invoking the SendAsync method on the email sender, passing in the appropriate information from the confirmation email record. This is the same email sender that you used in lesson 9 to send a notification email to the seller.
And finally the status of the task will be update to reflect the outcome of the command invocation. Either the email is marked as Sent or its status is reverted to Pending so that it gets retried.
When there are no tasks to process, then the background service goes to sleep for a certain time, after which it will check for new records.
public class SendAvailableConfirmationMails
{
    private readonly ILogger<SendAvailableConfirmationMails> logger;
    private readonly ISendEmails emailSender;
    private readonly IPersistAvailableConfirmationMails storage;

    public SendAvailableConfirmationMails(IPersistAvailableConfirmationMails storage, ISendEmails emailSender, ILogger<SendAvailableConfirmationMails> logger = null!)
    {
        this.logger = logger;
        this.emailSender = emailSender;
        this.storage = storage;
    }

    public async Task ProcessAsync(CancellationToken stoppingToken)
    {
        var email = await storage.GetAvailableConfirmationMail();

        if (email != null)
        {
            try
            {
                logger?.LogInformation("Confirmation mail available, sending it...");

                await emailSender.SendAsync(email.SenderEmailAddress,
                                                        email.BuyerEmailAddress,
                                                        email.EmailSubject,
                                                        email.EmailBody);

                await this.storage.MarkAsSent(email);

                logger?.LogInformation("Confirmation mail marked as sent...");
            }
            catch (Exception)
            {
                await this.storage.MarkAsPending(email);

                logger?.LogInformation("Sending confirmation mail failed, marked as pending...");
            }
        }
        else
        {
            await Task.Delay(TimeSpan.FromSeconds(5), stoppingToken);
        }
    }
services.AddSingleton<SendAvailableConfirmationMails>();
The background service is just a coordinator of the three different steps involved in task processing.
The details of loading the tasks and marking them as complete is encapsultated behind an interface dedicated for this purpose.
public interface IPersistAvailableConfirmationMails
{
    Task<ConfirmationMail?> GetAvailableConfirmationMail();

    Task MarkAsSent(ConfirmationMail mail);

    Task MarkAsPending(ConfirmationMail mail);
}
You implement this interface on the PersistAvailableConfirmationMails class.
The GetAvailableConfirmationMail method encapsulates the WITH UPDATE OUTPUT query discussed earlier.
Using the provided connection string it establishes a connection with the sql server database and executes the sql query to obtain a record representing an available confirmation email.
It converts the record to a ConfirmationMail instance by reading out the respective fields.
public class PersistAvailableConfirmationMails : IPersistAvailableConfirmationMails
{
    private string connectionstring;

    public PersistAvailableConfirmationMails(string connectionstring)
    {
        this.connectionstring = connectionstring;
    }

    private readonly string getAvailableConfirmationMailSqlCommand =
@"WITH task AS (
SELECT TOP(1) [dbo].[SalesOrderConfirmations].*, [dbo].[NotificicationPreferences].EmailAddress as BuyerEmailAddress
FROM[dbo].[SalesOrderConfirmations]
        INNER JOIN[dbo].[NotificicationPreferences] on[dbo].[SalesOrderConfirmations].[BuyerId] = [dbo].[NotificicationPreferences].[BuyerId]
        WHERE[dbo].[SalesOrderConfirmations].[Status] = 'Pending')
UPDATE task
SET [Status] = 'Processing'
OUTPUT
    deleted.OrderId,
    deleted.BuyerId,
    deleted.SenderEmailAddress,
    deleted.BuyerEmailAddress,
    deleted.EmailSubject,
    deleted.EmailBody,
    inserted.Status;";

    public async Task<ConfirmationMail?> GetAvailableConfirmationMail()
    {
        var connection = new SqlConnection(connectionstring);
        connection.Open();

        using var command = new SqlCommand(getAvailableConfirmationMailSqlCommand, connection);
        using var dataReader = await command.ExecuteReaderAsync(CommandBehavior.SingleRow);

        if (!await dataReader.ReadAsync())
        {
            return null;
        }

        return await ToConfirmationMail(dataReader);
    }

    private async Task<ConfirmationMail> ToConfirmationMail(SqlDataReader dataReader)
    {
        return new ConfirmationMail
        {
            OrderId = await dataReader.GetFieldValueAsync<string>(0),
            BuyerId = await dataReader.GetFieldValueAsync<string>(1),
            SenderEmailAddress = await dataReader.GetFieldValueAsync<string>(2),
            BuyerEmailAddress = await dataReader.GetFieldValueAsync<string>(3),
            EmailSubject = await dataReader.GetFieldValueAsync<string>(4),
            EmailBody = await dataReader.GetFieldValueAsync<string>(5),
            Status = await dataReader.GetFieldValueAsync<string>(6)
        };
    }
}
To mark a task as complete (or pending), the class encapsulates the UPDATE statement discussed earlier.
Executing the update statement is very similar to the query: it opens a connection to the sql database, then executes the command using the ExecuteNonQueryAsync method.
public class PersistAvailableConfirmationMails : IPersistAvailableConfirmationMails
{
    private readonly string updateAvailableConfirmationMailSqlCommand = @"UPDATE [dbo].[SalesOrderConfirmations] SET[Status] = @status Where [OrderId] = @orderId;";

    public async Task MarkAsSent(ConfirmationMail mail)
    {
        var connection = new SqlConnection(connectionstring);
        connection.Open();

        using var command = new SqlCommand(updateAvailableConfirmationMailSqlCommand, connection);
        command.Parameters.AddWithValue("@status", "Sent");
        command.Parameters.AddWithValue("@orderId", mail.OrderId);
        await command.ExecuteNonQueryAsync();
    }

    public async Task MarkAsPending(ConfirmationMail mail)
    {
        var connection = new SqlConnection(connectionstring);
        connection.Open();

        using var command = new SqlCommand(updateAvailableConfirmationMailSqlCommand, connection);
        command.Parameters.AddWithValue("@status", "Pending");
        command.Parameters.AddWithValue("@orderId", mail.OrderId);
        await command.ExecuteNonQueryAsync();
    }
}
To make the PersistAvailableConfirmationMails class available for injection in the background service, you also add it to the service collection in program.cs while providing the connection string from user secrets.
var sqlServerConnectionString = hostContext.Configuration.GetValue<string>("SqlServerConnectionString")
                               ?? throw new Exception("No 'SqlServerConnectionString' was provided. Use User Secrets or specify via environment variable.");

services.AddSingleton<IPersistAvailableConfirmationMails>(new PersistAvailableConfirmationMails(sqlServerConnectionString));
Project data into database
The automated task processing pattern is now completed, but there is still a missing part that ensures both tables get updated with the correct data.
The rest of the lesson will be dedicated to completing the tutorial and get these aspects in.
Project confirmation mails
In lesson 10 you already learned how to achieve polyglot persistence, now you'll extend this system with another data source.
The same events that got projected into a searchable record, can also be projected into a relation record to be stored in sql server.
The shape of this record represents the confirmation email to be sent though, and not the sales order as it did previously.
The confirmation mail gets stored as draft when the BookingStarted, and only becomes pending when SalesOrderConfirmed.
public class ProjectConfirmationMail :
    IProjection<ConfirmationMail, BookingStarted>,
    IProjection<ConfirmationMail, SalesOrderConfirmed>
{
    public void Project(ConfirmationMail confirmationMail, BookingStarted msg)
    {
        confirmationMail.OrderId = msg.BookingId;
        confirmationMail.BuyerId = msg.BuyerId;
        confirmationMail.SenderEmailAddress = "sender@seller.com";
        confirmationMail.EmailSubject = "Your purchase order";
        confirmationMail.EmailBody = "You order has been confirmed";
        confirmationMail.Status = "Draft";
    }

    public void Project(ConfirmationMail confirmationMail, SalesOrderConfirmed msg)
    {
        confirmationMail.Status = "Pending";
    }
}
To make this second projection available to the runtime, you add it to the already existing eventsourcing configuration for OrderBooking in program.cs of the worker.
runtimeConfiguration.EventSourcing(source =>
{
    source.Stream("OrderBooking",
        from => from.AzureTableStorage(storageConnectionString, "OrderBooking"),
        into => {
            into.Projection<ProjectToSearch>();
            into.Projection<ProjectConfirmationMail>();
        });

});
You add two more handlers to the system in order to invoke this projection in response to BookingStarted
public class IndexConfirmationMail : IHandle<BookingStarted>
{
    private readonly IPersistConfirmationMails _client;
    private readonly IInvokeProjections<ConfirmationMail> _projection;
    private readonly ILogger<IndexConfirmationMail> _logger;

    public IndexConfirmationMail(IInvokeProjections<ConfirmationMail> projection, IPersistConfirmationMails client, ILogger<IndexConfirmationMail> logger = null!)
    {
        _client = client;
        _projection = projection;
        _logger = logger;
    }

    public async Task Handle(BookingStarted message, IHandlerContext context)
    {
        _logger?.LogInformation("Received BookingStarted, indexing the confirmation mail...");

        var confirmationMail = await _client.GetConfirmationMail(message.BookingId) ?? new ConfirmationMail();

        _projection.Invoke(confirmationMail, message);

        await _client.Insert(confirmationMail);

        _logger?.LogInformation("Confirmation mail indexed");
    }
}
And in response to SalesOrderConfirmed
public class SetConfirmationMailAsPending : IHandle<SalesOrderConfirmed>
{
    private readonly IPersistConfirmationMails _client;
    private readonly IInvokeProjections<ConfirmationMail> _projection;
    private readonly ILogger<IndexConfirmationMail> _logger;

    public SetConfirmationMailAsPending(IInvokeProjections<ConfirmationMail> projection, IPersistConfirmationMails client, ILogger<IndexConfirmationMail> logger = null!)
    {
        _client = client;
        _projection = projection;
        _logger = logger;
    }

    public async Task Handle(SalesOrderConfirmed message, IHandlerContext context)
    {
        _logger?.LogInformation("Received SalesOrderConfirmed, marking the confirmation mail as pending...");

        var confirmationMail = await _client.GetConfirmationMail(message.BookingId);

        _projection.Invoke(confirmationMail, message);

        await _client.Update(confirmationMail);

        _logger?.LogInformation("Sales order marked as pending");
    }
}
You register these two handlers in a new atomic processing pipeline, in Program.cs, pulling messages from an orderconfirmation.indexing subscription.
runtimeConfiguration.AtomicProcessingPipeline(pipeline =>
{
    pipeline.PullMessagesFrom(p => p.Topic(name: "orderbooking.events", subscription: "orderconfirmation.indexing", serviceBusConnectionString));
    pipeline.DetectTypesInAssembly(typeof(BookingStarted).Assembly);
    pipeline.HandleMessagesWith<IndexConfirmationMail>();
    pipeline.HandleMessagesWith<SetConfirmationMailAsPending>();
});
Similar to the way you've built the task processor, you also encapsulate the interaction with the data store for projection purposes behind an interface called IPersistConfirmationMails.
This interface has three methods, to get, insert and update the ConfirmationMail instance.
public interface IPersistConfirmationMails
{
    Task<ConfirmationMail?> GetConfirmationMail(string id);

    Task Insert(ConfirmationMail mail);

    Task Update(ConfirmationMail mail);
}
The implementation of this interface is very similar to the available confirmation mails implementation.
The main difference is that the SELECT query only selects information from the SalesOrderConfirmations table, so it doesn't manage the buyer email address property.
Next to that it also encapsulates an insert statement to ensure that the record gets written.
public class PersistConfirmationMailsToSqlServer : IPersistConfirmationMails
{
    private string connectionstring;

    public PersistConfirmationMailsToSqlServer(string connectionstring)
    {
        this.connectionstring = connectionstring;
    }

    private readonly string selectSqlCommand = @"SELECT * FROM [dbo].[SalesOrderConfirmations] WHERE [OrderId] = @orderId;";
    private readonly string insertSqlCommand = @"INSERT INTO [dbo].[SalesOrderConfirmations] ([OrderId], [BuyerId], [SenderEmailAddress], [EmailSubject], [EmailBody], [Status]) VALUES (@orderId, @buyerId, @senderEmailAddress, @emailSubject, @emailBody, @status);";
    private readonly string updateSqlCommand = @"UPDATE [dbo].[SalesOrderConfirmations] SET [Status] = @status Where [OrderId] = @orderId;";

    public async Task<ConfirmationMail?> GetConfirmationMail(string id)
    {
        var connection = new SqlConnection(connectionstring);
        connection.Open();

        using var command = new SqlCommand(selectSqlCommand, connection);
        command.Parameters.AddWithValue("@orderId", id);

        using var dataReader = await command.ExecuteReaderAsync(CommandBehavior.SingleRow);

        if (!await dataReader.ReadAsync())
        {
            return null;
        }

        return await ToConfirmationMail(dataReader);
    }

    private async Task<ConfirmationMail> ToConfirmationMail(SqlDataReader dataReader)
    {
        return new ConfirmationMail
        {
            OrderId = await dataReader.GetFieldValueAsync<string>(0),
            BuyerId = await dataReader.GetFieldValueAsync<string>(1),
            SenderEmailAddress = await dataReader.GetFieldValueAsync<string>(2),
            EmailSubject = await dataReader.GetFieldValueAsync<string>(3),
            EmailBody = await dataReader.GetFieldValueAsync<string>(4),
            Status = await dataReader.GetFieldValueAsync<string>(5)
        };
    }

    public async Task Insert(ConfirmationMail mail)
    {
        var connection = new SqlConnection(connectionstring);
        connection.Open();

        using var command = new SqlCommand(insertSqlCommand, connection);
        command.Parameters.AddWithValue("@orderId", mail.OrderId);
        command.Parameters.AddWithValue("@buyerId", mail.BuyerId);
        command.Parameters.AddWithValue("@senderEmailAddress", mail.SenderEmailAddress);
        command.Parameters.AddWithValue("@emailSubject", mail.EmailSubject);
        command.Parameters.AddWithValue("@emailBody", mail.EmailBody);
        command.Parameters.AddWithValue("@status", "Draft");
        await command.ExecuteNonQueryAsync();
    }

    public async Task Update(ConfirmationMail mail)
    {
        var connection = new SqlConnection(connectionstring);
        connection.Open();

        using var command = new SqlCommand(updateSqlCommand, connection);
        command.Parameters.AddWithValue("@status", mail.Status);
        command.Parameters.AddWithValue("@orderId", mail.OrderId);
        await command.ExecuteNonQueryAsync();
    }
}
To make the implementation available, you register it in the services collection in Program.cs;
services.AddSingleton<IPersistConfirmationMails>(new PersistConfirmationMailsToSqlServer(sqlServerConnectionString));
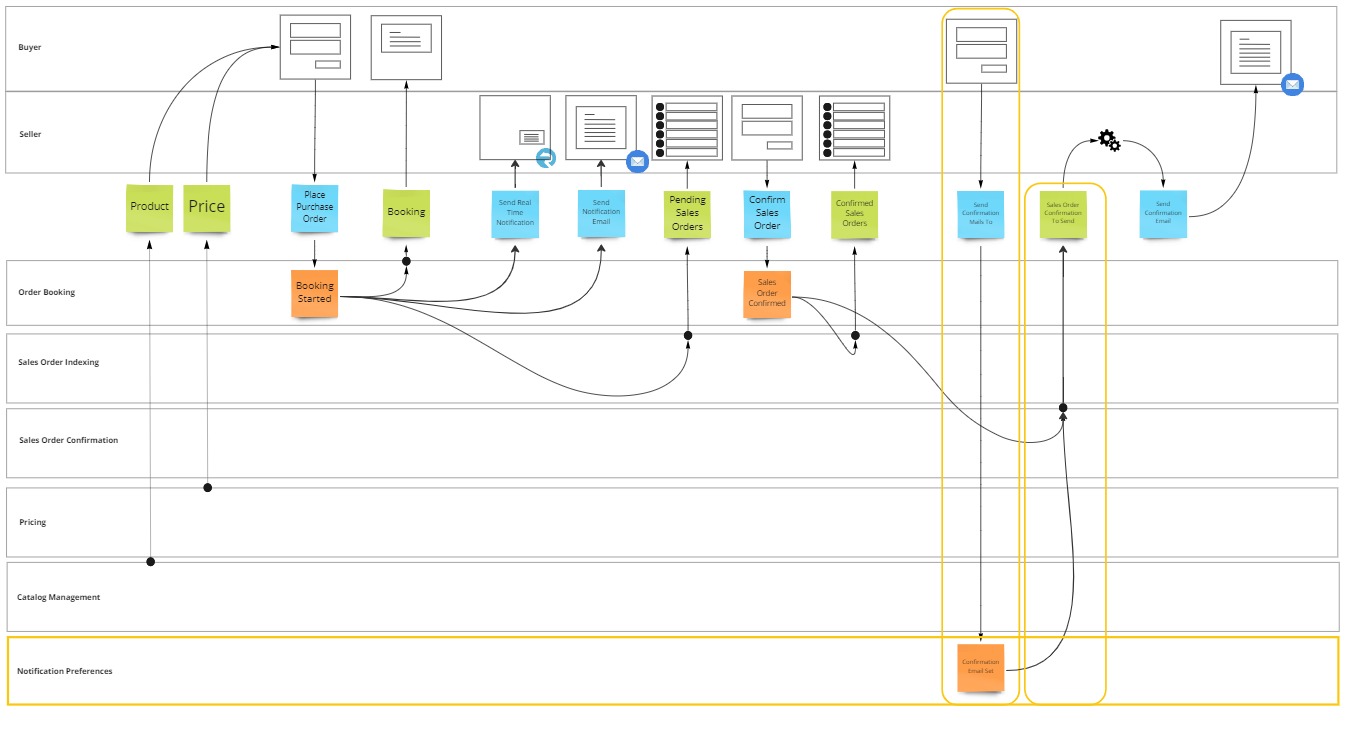
Implementing notification preferences
Implementing the management of notification preferences involves slightly more work, as you still need to implement the aggregate root and task oriented user interface as well.
Define events
You start by defining the event that signals the confirmation email address has been set.
public class ConfirmationEmailSet : SourcedEvent
{
    public string BuyerId { get; set; } = string.Empty;

    public string EmailAddress { get; set; } = string.Empty;
}
You do this in a new project called NotificationPreferences.Events of type class library, which you add to the solution. Also add a nuget reference towards the latest version of MessageHandler.EventSourcing.Contracts to this project.
Aggregate root
Likewise, to hold the aggregate root you add yet another project called NotificationPreferences of type class library add to the solution. and add a nuget reference towards the latest version of MessageHandler.EventSourcing to it.
The aggregate root, also called NotificationPreferences, is responsible for deciding on the SetConfirmationEmail command. When allowed it will raise the ConfirmationEmailSet event.
public class NotificationPreferences : EventSourced,
        IApply<ConfirmationEmailSet>
{
    private string _email;

    public NotificationPreferences() : this(Guid.NewGuid().ToString())
    {
    }

    public NotificationPreferences(string id) : base(id)
    {
    }

    public void SetConfirmationEmail(string email)
    {
        if (_email == email) return;

        Emit(new ConfirmationEmailSet()
        {
            BuyerId = Id,
            EmailAddress = email
        });
    }

    public void Apply(ConfirmationEmailSet evt)
    {
        _email = evt.EmailAddress;
    }
}
Expose command in web api
You decide to colocate the exposure of the NotificationPreferences aggregate root, with the OrderBooking in the same Web Api.
So you add a project reference from NotificationPreferences to OrderBooking.WebAPI.
In the Web Api project you define the message schema for the POST request as follows.
public class SetConfirmationMail
{
    public string BuyerId { get; set; } = string.Empty;

    public string EmailAddress { get; set; } = string.Empty;
}
And expose it through a new controller method on the api/notificationpreferences/{buyerId} router.
[ApiController]
[Route("api/notificationpreferences")]
public class NotificationPreferencesController : ControllerBase
{
    private IEventSourcedRepository<NotificationPreferences.NotificationPreferences> repository;

    public NotificationPreferencesController(IEventSourcedRepository<NotificationPreferences.NotificationPreferences> repository)
    {
        this.repository = repository;
    }

    [HttpPost("{buyerId}")]
    public async Task<IActionResult> Book([FromRoute] string buyerId, [FromBody] SetConfirmationMail command)
    {
        var preferences = await repository.Get(buyerId);

        preferences.SetConfirmationEmail(command.EmailAddress);

        await repository.Flush();

        return Ok();
    }
}
This controller method loads the aggregate root instance, invokes SetConfirmationEmail on it and flushes the emitted events.
Configure event sourcing
To make the IEventSourcedRepository<NotificationPreferences> repository instance available to the controller you need to configure another instance of the event sourcing runtime.
This instance will persist its events in the NotificationPreferences table, stream them into the NotificationPreferences aggregate root, and sets up the outbox to forward any emitted events to the notificationpreferences.events topic in your Azure Service Bus instance
runtimeConfiguration.EventSourcing(source =>
{
    source.Stream(nameof(NotificationPreferences.NotificationPreferences),
        from => from.AzureTableStorage(storageConnectionString, nameof(NotificationPreferences.NotificationPreferences)),
        into =>
        {
            into.Aggregate<NotificationPreferences.NotificationPreferences>()
                .EnableOutbox("NotificationPreferences", "orderbooking.webapi", pipeline =>
                {
                    pipeline.RouteMessages(to => to.Topic("notificationpreferences.events", serviceBusConnectionString));
                });
        });
});
Index notification preferences
On the other end of the topic, you add a subscription called notificationpreferences.indexing.
You configure a new atomic processing pipeline in the Program.cs file of the worker project to set up a new atomic processing pipeline which pulls from that subscription.
The events received on the subscription will be detected as type ConfirmationEmailSet and handled by the IndexNotificationPreferences handler that you'll create next.
runtimeConfiguration.AtomicProcessingPipeline(pipeline =>
{
    pipeline.PullMessagesFrom(p => p.Topic(name: "notificationpreferences.events", subscription: "notificationpreferences.indexing", serviceBusConnectionString));
    pipeline.DetectTypesInAssembly(typeof(ConfirmationEmailSet).Assembly);
    pipeline.HandleMessagesWith<IndexNotificationPreferences>();
});
The IndexNotificationPreferences handler is very similar to all the other projection handlers you've created before.
It first loads any existing preferences record through an instance of IPersistNotificationPreferences.
Then it will invoke the projection logic represented by IInvokeProjections<NotificationPreferences>.
And finally it will persist the data back throught the IPersistNotificationPreferences interface. Note that Sql Server has no upsert statement, and that the ConfirmationEmailSet even can occur multiple times. So it is up to you to call either Insert or Update depending if the record already existed or not
public class IndexNotificationPreferences : IHandle<ConfirmationEmailSet>
{
    private readonly IPersistNotificationPreferences _client;
    private readonly IInvokeProjections<NotificationPreferences> _projection;
    private readonly ILogger<IndexNotificationPreferences> _logger;

    public IndexNotificationPreferences(IInvokeProjections<NotificationPreferences> projection, IPersistNotificationPreferences client, ILogger<IndexNotificationPreferences> logger = null!)
    {
        _client = client;
        _projection = projection;
        _logger = logger;
    }

    public async Task Handle(ConfirmationEmailSet message, IHandlerContext context)
    {
        _logger?.LogInformation("Received ConfirmationEmailSet, indexing the notification preferences...");

        var insert = false;
        var preferences = await _client.GetNotificationPreferences(message.BuyerId);
        if (preferences == null)
        {
            preferences = new NotificationPreferences();
            insert = true;
        }

        _projection.Invoke(preferences, message);

        if(insert)
        {
            await _client.Insert(preferences);
        }
        else
        {
            await _client.Update(preferences);
        }

        _logger?.LogInformation("Notification preferences indexed");
    }
}
The NotificationPreferences entity contains only the BuyerId and the EmailAddress properties
public class NotificationPreferences
{
    public string BuyerId { get; set; } = string.Empty;
    public string EmailAddress { get; set; } = string.Empty;
}
The projection logic to copy over the data from the ConfirmationEmailSet event is equally trivial.
public class ProjectNotificationPreferences :
        IProjection<NotificationPreferences, ConfirmationEmailSet>
{
    public void Project(NotificationPreferences model, ConfirmationEmailSet evt)
    {
        model.BuyerId = evt.BuyerId;
        model.EmailAddress = evt.EmailAddress;
    }
}
To make the projection available to the runtime, you set up another event sourcing configuration in the Program.cs file of the worker.
This instance streams from the NotificationPreferences table into the ProjectNotificationPreferences projection you just created.
runtimeConfiguration.EventSourcing(source =>
{
    source.Stream("NotificationPreferences",
        from => from.AzureTableStorage(storageConnectionString, "NotificationPreferences"),
        into => {
            into.Projection<ProjectNotificationPreferences>();
        });
});
The IndexNotificationPreferences also depends on an IPersistNotificationPreferences which encapsulates the sql statements need to fulfill the need of getting the preferences from the database and storing it back.
public interface IPersistNotificationPreferences
{
    public Task<NotificationPreferences?> GetNotificationPreferences(string id);

    public Task Insert(NotificationPreferences preferences);

    public Task Update(NotificationPreferences preferences);
}
The implementation of this interface backs the GetNotificationPreferences by a SELECT statement and returns the resulting record converted into a NotificationPreferences instance.
The Insert and Update methods are backed by the corresponding INSERT and UPDATE sql statements. They are executed using the ExecuteNonQueryAsync operation.
public class PersistNotificationPreferencesToSqlServer : IPersistNotificationPreferences
{
    private string connectionstring;

    public PersistNotificationPreferencesToSqlServer(string connectionstring)
    {
        this.connectionstring = connectionstring;
    }

    private readonly string selectSqlCommand = @"SELECT * FROM [dbo].[NotificationPreferences] WHERE [BuyerId] = @buyerId;";
    private readonly string insertSqlCommand = @"INSERT INTO [dbo].[NotificationPreferences] ([BuyerId], [EmailAddress]) VALUES (@buyerId, @emailAddress);";
    private readonly string updateSqlCommand = @"UPDATE [dbo].[NotificationPreferences] SET [EmailAddress] = @emailAddress Where [BuyerId] = @buyerId;";

    public async Task<NotificationPreferences?> GetNotificationPreferences(string id)
    {
        var connection = new SqlConnection(connectionstring);
        connection.Open();

        using var command = new SqlCommand(selectSqlCommand, connection);
        command.Parameters.AddWithValue("@buyerId", id);

        using var dataReader = await command.ExecuteReaderAsync(CommandBehavior.SingleRow);

        if (!await dataReader.ReadAsync())
        {
            return null;
        }

        return await ToNotificationPreferences(dataReader);
    }

    private async Task<NotificationPreferences> ToNotificationPreferences(SqlDataReader dataReader)
    {
        return new NotificationPreferences
        {
            BuyerId = await dataReader.GetFieldValueAsync<string>(0),
            EmailAddress = await dataReader.GetFieldValueAsync<string>(1)
        };
    }

    public async Task Insert(NotificationPreferences preferences)
    {
        var connection = new SqlConnection(connectionstring);
        connection.Open();

        using var command = new SqlCommand(insertSqlCommand, connection);
        command.Parameters.AddWithValue("@buyerId", preferences.BuyerId);
        command.Parameters.AddWithValue("@emailAddress", preferences.EmailAddress);
        await command.ExecuteNonQueryAsync();
    }

    public async Task Update(NotificationPreferences preferences)
    {
        var connection = new SqlConnection(connectionstring);
        connection.Open();

        using var command = new SqlCommand(updateSqlCommand, connection);
        command.Parameters.AddWithValue("@buyerId", preferences.BuyerId);
        command.Parameters.AddWithValue("@emailAddress", preferences.EmailAddress);
        await command.ExecuteNonQueryAsync();
    }
}
To make this implementation available to the handler, you add it as a singleton to the service collection in Program.cs;
services.AddSingleton<IPersistNotificationPreferences>(new PersistNotificationPreferencesToSqlServer(sqlServerConnectionString));
Design a Task Oriented UI to opt into confirmation emails
To expose the SetConfirmationMail command to the buyer, you design a web component that renders itself as a form.
The form requests an email address and exposes a button.
When the button is clicked, an HTTP POST request is performed towards the /api/notificationpreferences/{buyerid} route.
If the request was successfull, the component will redirect to a defined uri.
class SetConfirmationEmail extends HTMLElement {

    constructor() {
        super();

        this.innerHTML = `<form>
                            <fieldset>
                                <legend>Enter your email address to opt into confirmation emails</legend>
                                <table>
				                    <tbody>
                                        <tr>
                                            <td><label>Email</label></td>
                                            <td><input id="email" type="email" required /></td>
                                        </tr>
					                    <tr>
						                    <td colspan="2">
							                    <button type="submit">Submit</button>
						                    </td>
					                    </tr>
				                    </tbody>
			                    </table>
                            </fieldset>
                          </form>`
    }

    static get observedAttributes() {
        return ['data-redirect-uri'];
    }

    get redirectUri() {
        return this.getAttribute('data-redirect-uri');
    }

    set redirectUri(val) {
        if (val) {
            this.setAttribute('data-redirect-uri', val);
        } else {
            this.removeAttribute('data-redirect-uri');
        }
    }

    connectedCallback() {
        var form = this.querySelector("form");
        this.submitBinding = event => this.submitHandler(event);
        form.removeEventListener("submit", this.submitBinding);
        form.addEventListener("submit", this.submitBinding);
    }

    async submitHandler(event)
    {
        event.preventDefault();

        let buyerId = "buyer1";

        let cmd = {
            buyerId: buyerId,
            emailAddress: event.target.querySelector("#email").value
        }
        let uri = "https://localhost:7100/api/notificationpreferences/" + buyerId;

        let response = await fetch(uri, {
            method: "POST",
            mode: 'cors',
            headers: {
                "Content-Type": "application/json"
            },
            body: JSON.stringify(cmd)
        });

        if (response.status == 200) {
            window.location = this.redirectUri + "?b=" + buyerId;
        }
        else {
            alert("Unexpected response")
        }
    }

}

customElements.define('set-confirmation-email', SetConfirmationEmail);
This component is exposed as the <set-confirmation-email> html tag, which you add to the booking/index.html page that is shown after the order has been placed.
<!DOCTYPE html>
<html>
    <head>
        <meta charset="utf-8" />
        <title></title>

        <script src='/js/booking.js' type="module"></script>
        <script src='/js/setconfirmationmail.js' type="module"></script>
    </head>
    <body>
        <h1>Thank you for your order</h1>
        <div>
            Your purchase order has been received and is being processed, the booking currently has status: <booking-state></booking-state>
        </div>
        <div>
            <h2>Want a confirmation email?</h2>
            <set-confirmation-email data-redirect-uri="/preferences/"></set-confirmation-email>
        </div>
    </body>
</html>
When the set-confirmation-email form got submitted successfully, the form gets redirected to /preferences/index.html which you add to the project as well.
<!DOCTYPE html>
<html>
    <head>
        <meta charset="utf-8" />
        <title></title>

        <script src='/js/preferences.js' type="module"></script>
    </head>
    <body>
        <h1>Your confirmation email was set</h1>
        <div>
            You should receive a confirmation emails from now on.
        </div>
    </body>
</html>
Test the solution
Wow, that was a lot of hard work, but you've completed it all now.
Time to hit F5 and try you e-commerce solution end to end..
Start by navigating to the buyer UI and place a new order, followed by setting the notification preferences.
Secondly navigate to the Seller UI and confirm the pending order, you should now see in the worker console log that the confirmation email has been sent.
The code created up until now can also be found in the 11 automated task processing folder of the reference repository.
Summary
You have completed the entire tutorial, and have built an e-commerce process in which a buyer can buy any amount of widgets, and the seller can approve whether he or she can fulfill that order. If so, the system will send a confirmation email to the buyer.