Introduction
In this lesson, you'll learn how to implement the task processing pattern, in such a way that a human being is performing the work.
Which is a good thing...
Software exists to support the day to day activities performed by humans, and often you want them to invoke the crucial actions in the system.
Manual task processing allows just that.
By the end of this lesson, you will:
- Understand what task processing is.
- Have learned how to implement this pattern for your users.
- Be able to identify the need for manual task processing in your business process.
What is a Task Processing
Task processing is the simple act of looking at a set of data and then decide what needs to be done with it (by invoking a command).
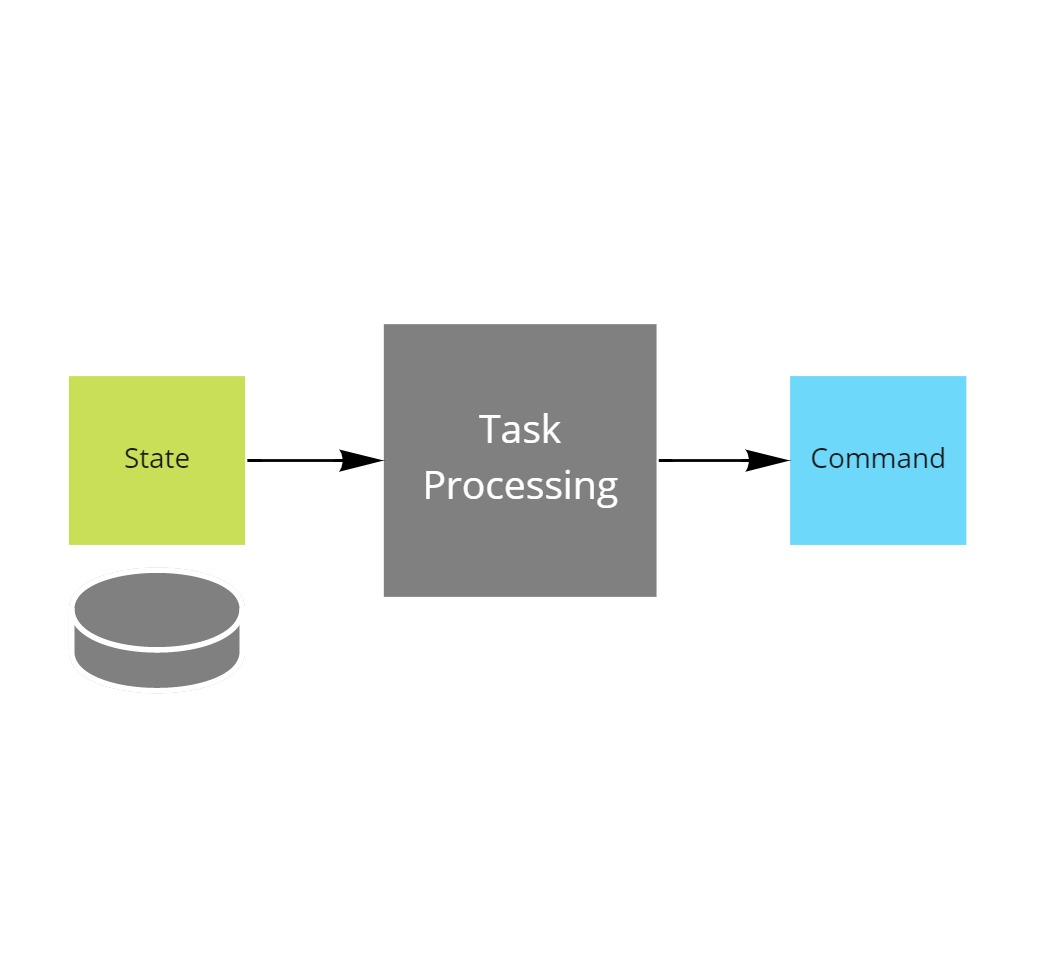
Some people also call this the todo-list pattern.
Where the state represents a list of what should be done, while the processor instructs the system to perform an action on each item of the list.
Task processing is very often done by humans, but it can also be automated when the conditions for invoking the command are well known.
In this lesson you'll learn how to implement the manual version, in the next you'll automate one.
Identifying the manual task processing pattern
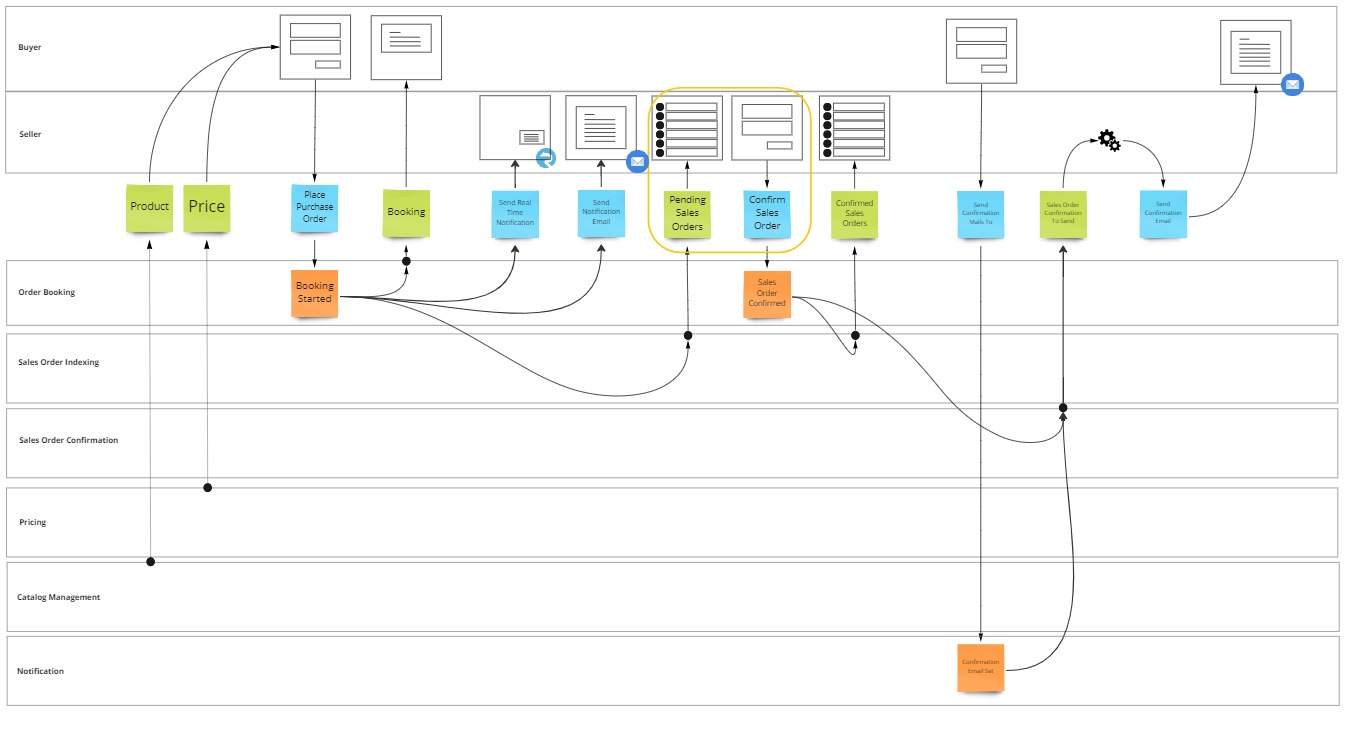
You can identify the need for manual task processing in a business process by looking at the user swimlanes.
Whenever a user is looking at a list of information, followed by invoking an action on a selected item, you can leverage this pattern.
In our basic e-commerce process, the seller needs to manually verify whether a sales order can be fulfilled or not.
When there is enough inventory available, and when e.g. payment has been received through wire transfer, then the seller should approve it.
Implementing manual task processing
As usual throughout this series, you can pick up the codebase from where you left it last time, it's in 09 polyglot persistence of the learning path reference repository.
Implementing the manual task processing pattern boils down to doing two things
- Show the potential tasks to the user.
- Provide a way to invoke an action on each task.
Translated to this use case, this implies:
- Showing a list of pending orders to the user.
- Allow them to invoke the confirm sales order command.
Show the pending orders to the user
To show the pending orders to the seller you will first expose the search results through the Web Api.
In the seller UI, you'll then implement a component to show the list of pending sales orders from this api call.
Add a package reference to Azure.Search.Documents
To expose the pending sales orders as search results from the Web API, you first add the Azure Search SDK to the Web API project
- Right click on Dependencies of the OrderBooking.WebAPI project in the Solution Explorer and choose Manage Nuget Packages.
- In the Nuget Package Manager window, browse for
Azure.Search.Documents. - Select the latest version and click Install.
- Click I Accept in the License Acceptance window.
Configure Azure Search
Then you provide an extension method which adds a SearchClient instance to the service collection of the web api.
public static class Search
{
    public static IServiceCollection AddSearch(this IServiceCollection services, string endpoint, string apiKey)
    {
        var searchClient = new SearchClient(new Uri(endpoint), "salesorders", new AzureKeyCredential(apiKey));

        services.AddSingleton(searchClient);

        return services;
    }
}
You load your search endpoint configuration and API key from user secrets, after which you pass them into the extension method in Program.cs.
var searchEndpoint = builder.Configuration.GetValue<string>("SearchEndpoint") ?? throw new Exception("No 'SearchEndpoint' connection string was provided. Use User Secrets or specify via environment variable.");
var apiKey = builder.Configuration.GetValue<string>("SearchApiKey") ?? throw new Exception("No 'azuresearchapikey' connection string was provided. Use User Secrets or specify via environment variable.");

builder.Services.AddSearch(searchEndpoint, apiKey);
Manage User Secrets
The search endpoint configuration and API key must be added to each projects user secrets file.
As the web api doesn't yet have these configured you will need to add them.
Right-click on the OrderBooking.WebAPI project in the Solution Explorer and choosing Manage User Secrets.
Visual Studio will now open your personal user secrets file associated to the project.
Modify the json content of the secrets file to include the SearchEndpoint and SearchApiKey properties with the correct values.
{
    "SearchEndpoint": "https://your.search.windows.net",
    "SearchApiKey": "YourApiKeyGoesHere"
}
Define the search model (again)
In the polyglot persistence lesson you already defined the search model in the worker project.
The same model needs to be known in the web api as well to query the index.
You can just copy over the SalesOrder class from the worker into the web api project.
public class SalesOrder
{
    [SimpleField(IsKey = true, IsFilterable = true)]
    public string Id { get; set; } = string.Empty;

    [SearchableField(IsFilterable = true, IsSortable = true)]
    public string Name { get; set; } = string.Empty;

    [SimpleField(IsFilterable = true, IsSortable = true)]
    public string Status { get; set; } = string.Empty;

    [SimpleField(IsSortable = true)]
    public int Amount { get; set; }
}
Expose search query
In the ApiRoutingConfiguration you add a new api route to expose the pending sales orders to the seller UI via the pending route.
This api method will use the SearchClient to search through the sales orders index.
You inject this SearchClient through the callback.
To query only the pending sales orders you pass the * wildcard into the SearchAsync call while making use of a filter statement stating Status eq 'Pending'.
The response coming back from the search service also includes metadata to rank and weigh the search results.
This is information you don't want to expose to the seller UI, so you also limit the result set by selecting the Document property of each result.
[HttpGet("pending")]
orderBookings.MapGet("pending", async(SearchClient client) =>
{
    var filter = "Status eq 'Pending'";
    var response = await client.SearchAsync<SalesOrder>("*", new SearchOptions() { Filter = filter, Size = 1000 });
    var pendingOrders = response.Value.GetResults().Select(x => x.Document);

    return TypedResults.Ok(pendingOrders);
})
.Produces(StatusCodes.Status200OK);
Implement a component in the seller UI to show the pending orders
To visually show the pending orders to the seller, you add a new component to the Seller UI.
- Right click on the js folder in the Solution Explorer and choose Add > New Item.
- In the Add New Item window select Javascript File and name it
pendingorders.js.
In the javascript file you add a new class, called PendingOrders which inherits from HTMLElement, and you define it as a custom component called pending-orders.
class PendingOrders extends HTMLElement {

    constructor() {
        super();

    }

    async connectedCallback() {

    }

}

customElements.define('pending-orders', PendingOrders);
You include the pendingorders.js file as a module script on the index.html page.
And include the <pending-orders> html tag in the body of the page.
<script src='/js/pendingorders.js' type="module"></script>

<pending-orders></pending-orders>
When the component gets connected to the DOM, you first load the sales orders, if you haven't already.
Then you render the component.
async connectedCallback() {
    if (!this.salesOrders) {
        this.salesOrders = await this.load();
    }

    this.render();
}
To load the sales orders you call the pending route, which you defined before on the web api, and deserialize the json response to a javascript object using the json() method
async load() {
    let uri = "https://localhost:7100/api/orderbooking/pending/";
    let response = await fetch(uri, {
        method: "GET",
        mode: 'cors',
        headers: {
            "Content-Type": "application/json"
        }
    });

    if (response.status == 200) {
        return await response.json();
    }
    else {
        return null;
    }
}
To render the orders you need a few templates.
First of all there is the template that will make up the body of the component, this template represents an html table.
Then there is also the row template which will be used to render the individual pending orders.
constructor() {
    super();

    this.innerHTML = `<table>
                        <tbody>
                            <tr>
                                <th># Widgets</th>
                                <th>Ordered by</th>
                                <th>Action</th>
                            </tr>
                        </tbody>
                        <tbody id="orders"></tbody>
                        </table>`;

    this.rowTemplate = `<tr>
                            <td class="text-amount"></td>
                            <td class="text-name"></td>
                            <td></td>
                        </tr>`;
}
While rendering you first get the orders tbody element and clear it out.
Then you iterate through the sales orders, and create an element from the row template to fill up the amount cell and the name cell.
The htmlToElement method, helps to convert the html row template string to an actual html element by passing it through a <template> tag.
render() {
    var table = this.querySelector("#orders");
    table.innerHTML = "";

    for (var order of this.salesOrders)
    {
        var row = this.htmlToElement(this.rowTemplate);

        var amount = row.querySelector(".text-amount");
        amount.innerHTML = order.amount;

        var name = row.querySelector(".text-name");
        name.innerHTML = order.name;

        table.append(row);
    }
}

htmlToElement(html) {
    var template = document.createElement('template');
    html = html.trim();
    template.innerHTML = html;
    return template.content.firstChild;
}
Allow user to call the confirm command
Now that the user can see the pending orders, you will allow them to confirm these orders.
Implement the confirm command
First you implement the confirm command itself, by adding a method ConfirmSalesOrder to the aggregate root OrderBooking, which you find in the OrderBooking project.
The command first checks if the booking had been confirmed before, and if not it will confirm the order.
In the Apply method, which is called whenever the aggregate is restored, or when the SalesOrderConfirmed is emitted, you remember that the order is confirmed.
public class OrderBooking : EventSourced,
    IApply<SalesOrderConfirmed>
{
    private bool _confirmed;

    public void ConfirmSalesOrder()
    {
        if (_confirmed) return;

        Emit(new SalesOrderConfirmed()
        {
            BookingId = Id
        });
    }

    public void Apply(SalesOrderConfirmed msg)
    {
        _confirmed = true;
    }
}
Expose the confirm command through the API
Now that the command itself is implemented, you expose it via the web API.
First you define a schema for the exposed command, all it contains is the id of the booking to confirm.
public class ConfirmSalesOrder
{
    public string BookingId { get; set; } = string.Empty;
}
Then you define a route, in the ApiRoutingConfiguration to expose that command on the {bookingId}/confirm route.
This method gets the booking, calls ConfirmSalesOrder and flushes any event that may have been emitted from the aggregate root.
 orderBookings.MapPost("{bookingId}/confirm",
 async (IEventSourcedRepository<Booking> repo, string bookingId) =>
 {
     var aggregate = await repo.Get(bookingId);
     aggregate.ConfirmSalesOrder();
     await repo.Flush();

     return Results.Ok(aggregate.Id);
 })
 .Produces(StatusCodes.Status200OK);
The command is now exposed and can be used from the Seller UI.
Call the confirm command from a web component
To call the confirm command from the Seller UI, you create a web component named ConfirmSalesOrder.
You put the code in the confirmsalesorder.js file.
- Right click on the js folder in the Solution Explorer and choose Add > New Item.
- In the Add New Item window select Javascript File and name it
confirmsalesorder.js.
You define the ConfirmSalesOrder component as the backing of the <confirm-sales-order> html tag.
class ConfirmSalesOrder extends HTMLElement {

    constructor() {
        super();
    }

    async connectedCallback() {

    }
}

customElements.define('confirm-sales-order', ConfirmSalesOrder);
Next you use this tag, in the row template of the PendingOrders list, which you find in the pendingorders.js file.
this.rowTemplate = `<tr>
                        <td class="text-amount"></td>
                        <td class="text-name"></td>
                        <td><confirm-sales-order></confirm-sales-order></td>
                    </tr>`;
The ConfirmSalesOrder component needs to obtain the order id of the order to confirm.
This order id will need to be passed down from the list of pending orders.
To achieve this objective, you expose a data attribute from ConfirmSalesOrder, called data-order-id.
class ConfirmSalesOrder extends HTMLElement {

    constructor() {
        super();
    }

    static get observedAttributes() {
        return ['data-order-id'];
    }

    get orderId() {
        return this.getAttribute('data-order-id');
    }

    set orderId(val) {
        if (val) {
            this.setAttribute('data-order-id', val);
        } else {
            this.removeAttribute('data-order-id');
        }
    }

    async connectedCallback() {

    }

}

customElements.define('confirm-sales-order', ConfirmSalesOrder);
To pass the id of the order to confirm into the web component, you modify the render method of the PendingOrders list to set the data-order-id attribute on the confirm-sales-order element.
var action = row.querySelector("confirm-sales-order");
action.setAttribute("data-order-id", order.id)
Finally you render a <button> inside the ConfirmSalesOrder component, and bind the confirm api call to the click event of that button.
When the confirm api call completed successfully, you raise a DOM event to notify that the order is confirmed.
class ConfirmSalesOrder extends HTMLElement {

    constructor() {
        super();

        this.innerHTML = `<button>Confirm</button>`;
    }

    static get observedAttributes() {
        return ['data-booking-id'];
    }

    get orderId() {
        return this.getAttribute('data-order-id');
    }

    set orderId(val) {
        if (val) {
            this.setAttribute('data-order-id', val);
        } else {
            this.removeAttribute('data-order-id');
        }
    }

    async connectedCallback() {
        var button = this.querySelector("button");
        this.confirmBinding = () => this.confirm();
        button.removeEventListener("click", this.confirmBinding);
        button.addEventListener("click", this.confirmBinding);
    }

    async confirm() {
        let cmd = {
            bookingId: this.orderId
        }
        let uri = "https://localhost:7100/api/orderbooking/" + this.orderId + "/confirm/";
        let response = await fetch(uri, {
            method: "PUT",
            mode: 'cors',
            headers: {
                "Content-Type": "application/json"
            },
            body: JSON.stringify(cmd)
        });

        if (response.status == 200) {
            this.dispatchEvent(new Event("confirmed"));
        }
    }

}

customElements.define('confirm-sales-order', ConfirmSalesOrder);
In turn you subscribe the PendingOrders list to this confirmed event, and remove the row from the list in response.
action.addEventListener("confirmed", () => row.remove());
To activate the custom component, you include the confirmsalesorder.js file in the index.html document as a module.
<script src='/js/confirmsalesorder.js' type="module"></script>
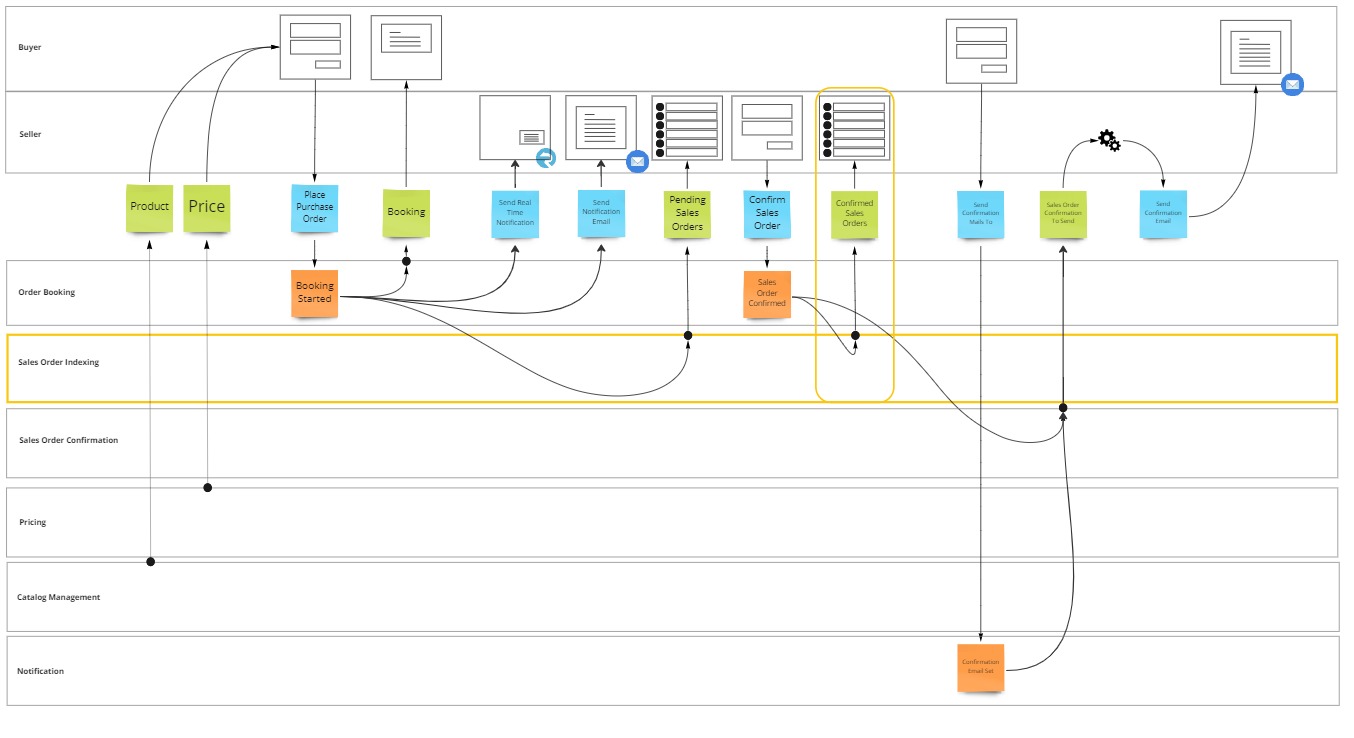
Extend projection to azure search
The SalesOrderConfirmed event, should also result in an update of the SalesOrder object which is stored in the azure search index.
This can be done by subscribing the indexing logic to the event and run the projection again.
First you ensure that the projection contains the projection logic that sets the order status in response to the SalesOrderConfirmed event.
You find this logic in the ProjectToSearch class of the OrderBooking.Worker project
public class ProjectToSearch :
    IProjection<SalesOrder, SalesOrderConfirmed>
{
    public void Project(SalesOrder salesOrder, SalesOrderConfirmed msg)
    {
        salesOrder.Status = "Confirmed";
    }
}
Then you add a new handler to OrderBooking.Worker, and make it handle the SalesOrderConfirmed event.
In response it loads the SalesOrder document from the index, calls the projection and stores the result back in the index.
public class IndexConfirmedSalesOrder : IHandle<SalesOrderConfirmed>
{
    private readonly SearchClient _client;
    private readonly IInvokeProjections<SalesOrder> _projection;
    private readonly ILogger<IndexSalesOrder> _logger;

    public IndexConfirmedSalesOrder(IInvokeProjections<SalesOrder> projection, SearchClient client, ILogger<IndexSalesOrder> logger = null!)
    {
        _client = client;
        _projection = projection;
        _logger = logger;
    }

    public async Task Handle(SalesOrderConfirmed message, IHandlerContext context)
    {
        _logger?.LogInformation("Received SalesOrderConfirmed, indexing the sales order...");

        var salesOrder = await _client.GetOrCreateSalesOrderAsync(message.BookingId);

        _projection.Invoke(salesOrder, message);

        await _client.Persist(salesOrder);

        _logger?.LogInformation("Sales order indexed");
    }
}
Finally you hook up the new handler into the pipeline pulling from the orderbooking.indexing subscription.
runtimeConfiguration.AtomicProcessingPipeline(pipeline =>
{
    pipeline.PullMessagesFrom(p => p.Topic(name: "orderbooking.events", subscription: "orderbooking.indexing", serviceBusConnectionString));
    pipeline.DetectTypesInAssembly(typeof(BookingStarted).Assembly);
    pipeline.HandleMessagesWith<IndexSalesOrder>();
    pipeline.HandleMessagesWith<IndexConfirmedSalesOrder>();
});
Test the solution
You made it to the end of lesson 11. It was a rather long one, but you made it to the end
You can now hit F5, navigate to the seller UI and confirm one of the pending orders.
The code created up until now can also be found in the 10 manual task processing folder of the reference repository.
Summary
In this lesson you learned how to implement manual task processing.
What’s coming next?
In the next, and final, lesson you’ll learn how to automate task processing.