Introduction
In this lesson, you'll implement a task oriented User Interface on top of the API's exposed by your aspnet web api.
By the end of this lesson, you will:
- Have implemented a form to collect purchase order information
- Show the booking status to the user after completing the form
What is a task oriented User Interface
Software systems exist to support humans while they are performing specific tasks.
Humans interact with this system through a user interface.
A task-oriented user interface is an interface which adapts itself to the task that the user intends to perform at a specific moment and to the context in which this task is performed.
It considers what the user is trying to do and adjusts accordingly.
User interfaces are not limited to application screens.
They involve every touchpoint between the system and the user, which may include other channels such as emails, phone calls, sensors.
Identifying user interfaces
User interfaces can be identified by looking at the top swimlanes of an event model.
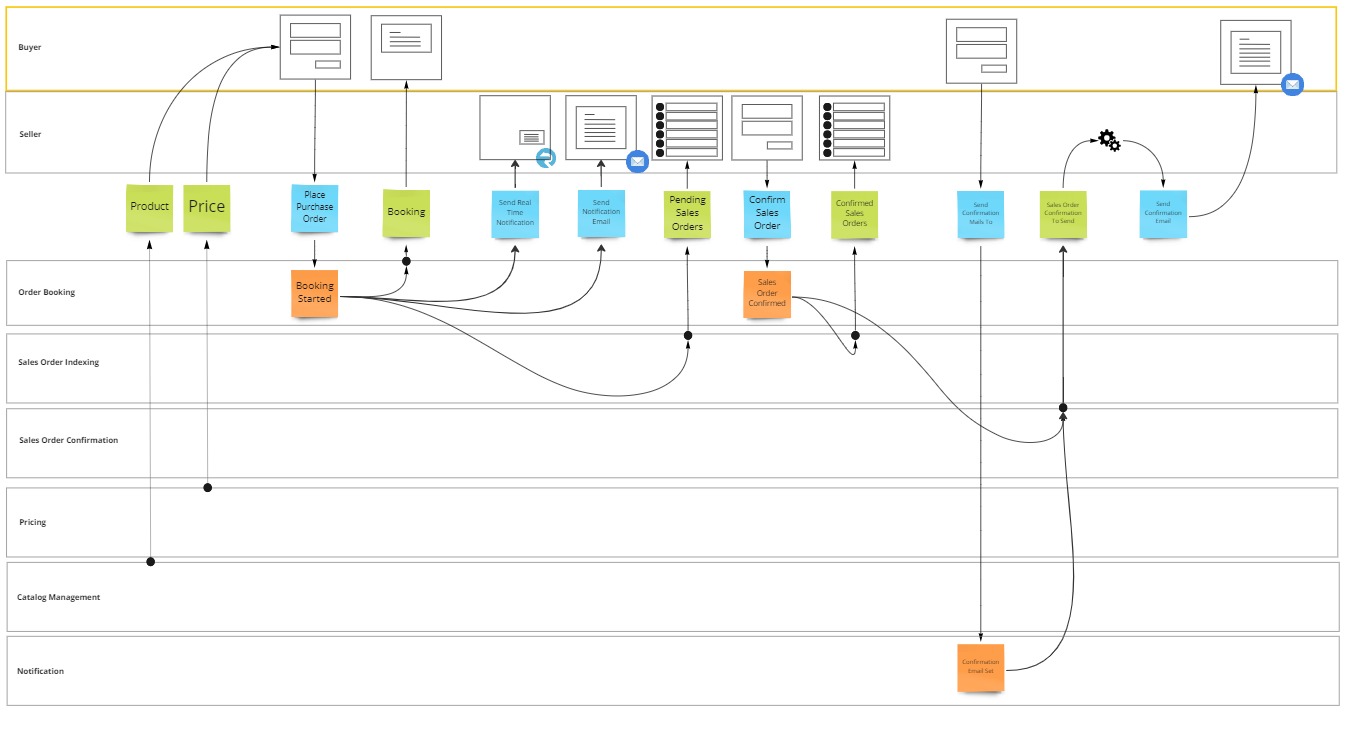
In this lesson you'll focus on the first two interaction points and implement them as web components.
In a task oriented user interface, usually only one web component representing a command is shown at a time.
Designing a task oriented UI
The code created in the previous lessons can also be found in the 05 aspnet folder of the reference repository.
Add a project to hold the web UI
- Right click the Solution MessageHandler.LearningPath in the Solution Explorer and choose Add > New Project.
- Select the project template called ASP.NET Core Empty, tagged with C#. Click Next.
- Enter project name
OrderBooking.WebUI.Buyer. Click Next. - Select framework .NET 8.0 (Long-term support). Click Create
Set the startup projects
Both the Web API and the Web UI will need to start when you try to run the solution. You achieve this by setting multiple startup projects
- Right click the Solution MessageHandler.LearningPath in the Solution Explorer and choose Set Startup Projects.
- Select the Multiple startup projects radio button.
- Change the Action to
Startfor for both OrderBooking.WebAPI and OrderBooking.WebUI.Buyer - Click OK
Set up static file serving
This Web UI project will only serve as a web server to serve the html and javascript files that make up your web UI.
To configure your aspnet core web UI this way, navigate to program.cs and replace the code app.MapGet("/", () => "Hello World!"); by:
app.UseDefaultFiles();
app.UseStaticFiles();
Create folders and files
Now it's time to create the folders and files that make up the client side code of your web UI.
Aspnet core web UI only serves files from the wwwroot folder, all files and folders need to go in there.
Add wwwroot folder
- Right click on the OrderBooking.WebUI.Buyer project in the Solution Explorer and choose Add > New Folder.
- Rename NewFolder to
wwwroot.
Add home page
- Right click on the wwwroot folder in the Solution Explorer and choose Add > New Item.
- In the Add New Item window select HTML PAGE and name it
index.html.
Add booking folder
- Right click on the wwwroot folder in the Solution Explorer and choose Add > New Folder.
- Rename NewFolder to
booking.
Add booking page
- Right click on the booking folder in the Solution Explorer and choose Add > New Item.
- In the Add New Item window select HTML PAGE and name it
index.html.
Add js folder
- Right click on the wwwroot folder in the Solution Explorer and choose Add > New Folder.
- Rename NewFolder to
js.
Add placepurchaseorder script
- Right click on the js folder in the Solution Explorer and choose Add > New Item.
- In the Add New Item window select Javascript File and name it
placepurchaseorder.js.
Add booking script
- Right click on the js folder in the Solution Explorer and choose Add > New Item.
- In the Add New Item window select Javascript File and name it
booking.js.
Expose PlacePurchaseOrder command as a web component
To expose the PlacePurchaseOrder command as a webcomponent, navigate to placepurchaseorder.js and add the following code.
class PlacePurchaseOrder extends HTMLElement {

}

customElements.define('place-purchase-order', PlacePurchaseOrder);
This code defines a custom element, called PlacePurchaseOrder, which extends from HTMLElement.
Doing this, allows you to use your own HTML tag, <place-purchase-order> in the home page, index.html directly it the folder wwwroot.
First import the script placepurchaseorder.js as a module.
<head>
    <script src='/js/placepurchaseorder.js' type="module"></script>
</head>
Then put your custom HTML tag in the body of the document.
<body>
    <place-purchase-order data-redirect-uri="/booking/"></place-purchase-order>
</body>
You also specify a data attribute, data-redirect-uri, with a uri pointing to the booking folder. The component will redirect there after successful submission of the form.
Render component html
Rendering the form is achieved by assigning the innerHTML property.
As the form is static in nature, you do this in the constructor of the custom element. Ensure to call super() before doing anything else though.
The form consist of:
- A legend
- An requried input type number, with a minimum value of 1
- And a submit button
constructor() {
    super();

    this.innerHTML =
        `<form>
            <fieldset>
                <legend>How many widgets would you like to buy?</legend>
                <table>
                    <tbody>
                        <tr>
                            <td><label>Amount</label></td>
                            <td><input id="amount" type="number" min="1" value="1" required /></td>
                        </tr>
                        <tr>
                            <td colspan="2">
                                <button type="submit">Submit</button>
                            </td>
                        </tr>
                    </tbody>
                </table>
            </fieldset>
        </form>`
    }
Make the redirect uri accessible
On the HTML tag you specified a data attribute representing the redirect uri where the form needs to redirect to after successful submission of the form.
The convention in web components is to expose this attribute as a property on the component, in the following way:
static get observedAttributes() {
    return ['data-redirect-uri'];
}

get redirectUri() {
    return this.getAttribute('data-redirect-uri');
}

set redirectUri(val) {
    if (val) {
        this.setAttribute('data-redirect-uri', val);
    } else {
        this.removeAttribute('data-redirect-uri');
    }
}
Subscribe to the submit event of the inner form
Your command component should only subscribe to it's inner form, when it is actually connected to the DOM.
You achieve this by adding and event handler to the submit event when the connectedCallback function is raised.
This happens every time the component gets added to the DOM, and can happen multiple times. So it is required to remember any previous subscriptions and remove them before readding the event listener.
connectedCallback() {
    var form = this.querySelector("form");
    this.submitBinding = event => this.submitHandler(event);
    form.removeEventListener("submit", this.submitBinding);
    form.addEventListener("submit", this.submitBinding);
}
Post the place purchase order command
To place the actual purchase order, you implement the submitHandler.
First call preventDefault on the incoming event in order to prevent the default submission of the form.
Then generate a new UUID that will serve as the booking id by calling crypto.randomUUID.
Subsequently you compose the command object, by specifying the booking id and extracting the amount ordered from the form into the purchaseOrder property.
Using the fetch statement, you execute an HTTP POST request towards the orderbooking api and pass in the command object as json.
Note that your port number (7100) may vary due to local development settings. Double check it against the port where your web API is running on.
When the response succeeds, your redirect the window to the provided redirectUri and pass along the booking id.
async submitHandler(event)
{
    event.preventDefault();

    let bookingId = crypto.randomUUID();

    let cmd = {
        bookingId: bookingId,
        name: "Mr. Buyer",
        purchaseOrder: {
            amount: event.target.querySelector("#amount").valueAsNumber
        }
    }
    let uri = "https://localhost:7100/api/orderbooking/" + bookingId;

    let response = await fetch(uri, {
        method: "POST",
        mode: 'cors',
        headers: {
            "Content-Type": "application/json"
        },
        body: JSON.stringify(cmd)
    });

    if (response.status == 200) {
        window.location = this.redirectUri + "?b=" + bookingId;
    }
    else {
        alert("Unexpected response")
    }
}
Expose the Booking state as a web component
On the booking page, where the PlacePurchaseOrder component redirects to, you want to thank the user for their order and show the status of their booking.
To achieve this you need another web component that will visualize the state of their booking.
You navigate to booking.js in the js folder and define another custom element called BookingState.
class BookingState extends HTMLElement {

}

customElements.define('booking-state', BookingState);
Which you can the use in the index.html of the booking folder.
First import the booking.js script as a module.
<head>
    <script src='/js/booking.js' type="module"></script>
</head>
Then place the <booking-state> element in the HTML body, surrounded by the thank you text.
<body>
    <h1>Thank you for your order</h1>
    <div>
        Your purchase order has been received and is being processed, the booking currently has status: <booking-state></booking-state>
    </div>
</body>
Get the booking id from the search parameters
The PlacePurchaseOrder component passed the booking id as a search parameter 'b'.
This parameter is available in the window.location.search string.
You can parse this string into a URLSearchParams object. This object however looks like an array and is fairly cumbersome in usage.
To facilitate access to this object, you wrap it in a Proxy object, this allows to intercept any call towards the object and convert the convenient invocation into the more cumbersome params api.
In the end, you can access any parameter in the search string, throug a simple property invocation: this.params.b, which you expose as a property bookingId
constructor() {
    super();

    this.params = new Proxy(new URLSearchParams(window.location.search), {
        get: (searchParams, prop) => searchParams.get(prop),
    });
}

get bookingId() {
    return this.params.b;
}
Load the booking
To load the projected booking from the web API, you again use the fetch statement.
This time as a GET request, expecting a a json result.
Note again that your port number (7100) may vary due to local development settings. Double check it against the port where your web API is running on.
When the request succeeds, you parse the response body into a json object, using json() and return the result.
async load() {
    let uri = "https://localhost:7100/api/orderbooking/" + this.bookingId;
    let response = await fetch(uri, {
        method: "GET",
        mode: 'cors',
        headers: {
            "Content-Type": "application/json"
        }
    });

    if (response.status == 200) {
        return await response.json();
    }
    else {
        return null;
    }
}
Render the state
Rendering the result can again be done by setting the innerHTML property of the component.
Given that loading the object is quite an expensive operation, you don't do this in the constructor as you did with the form, but you do it only when the component is connected to the DOM and ensuring it doesn't happen twice by remembering the previously loaded booking.
async connectedCallback() {
    if (!this.booking)
    {
        this.booking = await this.load();
    }

    this.render();
}

render() {
    this.innerHTML = this.booking?.status;
}
Test the UI manually
Now hit F5, it's time to test your new Web UI.
Congratulations! You made it to the end of this lesson and finished your task oriented user interface.
The code created in this lesson can be found in the 06 task oriented UI folder of the reference repository.
Summary
In this lesson you learned how to build a task oriented user interface, which allows a specific person to interact with the system.
What’s coming next?
In Part 8 of the Tutorial, you’ll learn how to react to an event in a transient way, in order to notify the seller in real time about the new booking and get him or her involved in the process.