Introduction
In this lesson, you'll implement a Reaction pattern.
More specifically, a transient reaction, which means the reaction is best-effort in nature and is thus not guaranteed to be executed.
By the end of this lesson, you will:
- Understand what the responsibility of a Reaction is.
- Be able to identify the pattern from an Event Model.
- Determined if the reaction can be transient, or must be guaranteed.
- Have built, and tested, a transient implementation of the pattern using MessageHandler and SignalR.
What is a Reaction
A reaction responds to an occurance of an event by invoking a command.
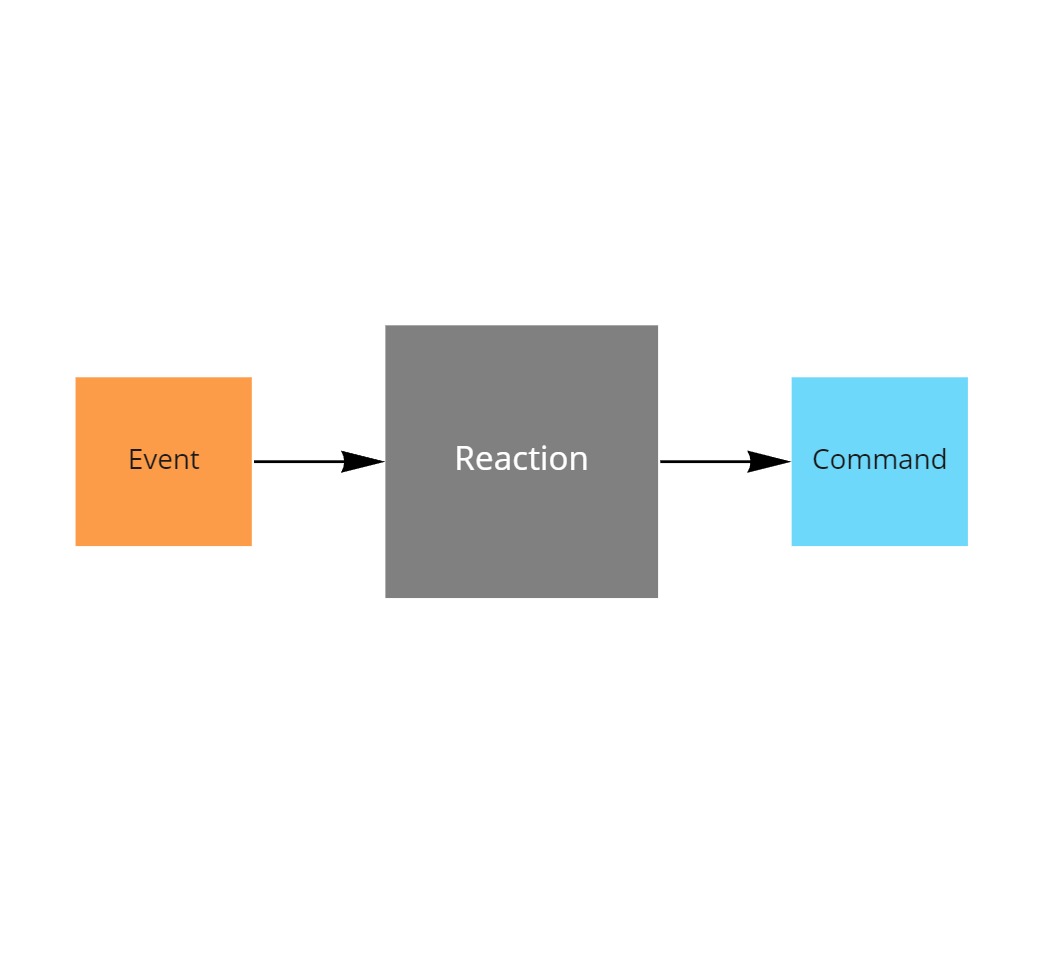
The command may be invoked locally in the process, or transported remotely through any kind of messaging transport.
Identifying Reactions
To identify a reaction in an Event Model, you search for the transitions between events (orange post-it) and commands (blue post-it).
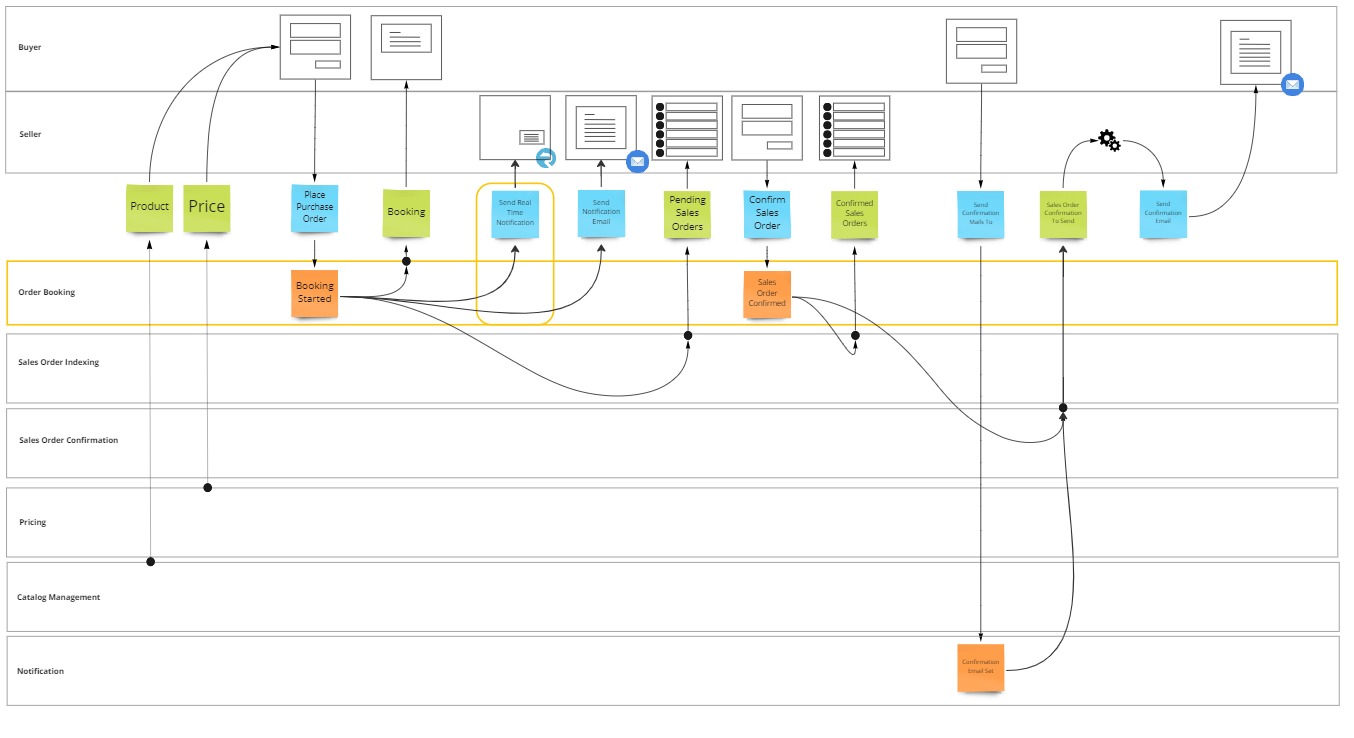
In this lesson you'll implement a reaction when BookingStarted occured, then the system will try to send a real time notification to the seller.
Transient or need for delivery guarantee?
The choice of messaging transport depends largely on how transient the reaction can be.
Transient means that there is no need to guarantee the delivery of the message.
In this case the system is just trying to notify the seller in real time, but this only makes sense in case the seller happens to be online at that moment and is focused on the screen.
Given there is no guarantee that the seller is online, nor that he or she is watching, the system also doesn't have to guarantee that this real time notification actually arrives.
Implementing the Reaction Pattern
You're going to implement the reaction in a similar way as you did the Aggregate Root and Projection patterns, TDD style!
You can pick up the codebase from where you left off last time, it's in 06 task oriented ui of the learning path reference repository.
Given that reactions often interact with infrastructure, such as SignalR in this case, the implementation belongs in the application layer and not in the domain layer.
To test them, you will need to ensure this interaction is tested as well, using component tests while mocking out any dependencies.
But first, extend the project system.
Add a project to hold the component tests
- Right click the Solution MessageHandler.LearningPath in the Solution Explorer and choose Add > New Project.
- Select the project template called xUnit Test Project, tagged with C#. Click Next.
- Enter project name
OrderBooking.ComponentTests. Click Next. - Select framework .NET 8.0 (Long-term support). Click Create
Add a package reference to Moq
- Right click on Dependencies of the OrderBooking.ComponentTests project in the Solution Explorer and choose Manage Nuget Packages.
- In the Nuget Package Manager window, browse for
Moq. - Select the latest version and click Install.
- Click I Accept in the License Acceptance window.
Add a project reference to OrderBooking.WebApi
- Right click on Dependencies of the OrderBooking.ComponentTests project in the Solution Explorer and choose Add Project Reference.
- In the Reference Manager window, select OrderBooking.WebApi. Click OK
Writing a component test
Right click on the OrderBooking.ComponentTests project in the Solution Explorer and choose Add > New Item.
In the Add New Item window select Class and name it WhenReactingToBookingStarted.cs.
You add a method to it that describes the scenario GivenBookingStarted_WhenNotifyingTheSeller_ShouldForwardMessageToSignal
public class WhenReactingToBookingStarted
{
    [Fact]
    public async Task GivenBookingStarted_WhenNotifyingTheSeller_ShouldForwardMessageToSignal()
    {

    }

}
Once the skeleton is in place, you can add code to it to reflect the scenario.
You start by outlining that a BookingStarted event is given, when notifying the seller of this event, then you expect signalr to be called.
You also assume that the NotifySeller reaction will implement the MessageHandler.EventSourcing.DomainModel.IChannel interface, which is typically used to attach transient reactions to the event sourced domain model.
This interface exposes a Push(IEnumerable<SourcedEvent> events) method which allows to push events into the reaction.
public class WhenReactingToBookingStarted
{
    [Fact]
    public async Task GivenBookingStarted_WhenNotifyingTheSeller_ShouldForwardMessageToSignal()
    {
        // given
        var bookingStarted = new BookingStarted();

        // todo: mock signalr

        //when
        var reaction = new NotifySeller(/* todo, inject mock */);
        await reaction.Push(new[] { bookingStarted });

        // Then: todo verify mock was called
    }

}
To mock out SignalR you leverage the Moq library, so you import it into the component test with a using statement.
using Moq;
Then you use the Mock<T> class to emulate any interaction and make them verifiable.
Interacting with SignalR requires three levels of interaction
- IClientProxy: This is the actual interaction with a subscribed client, you expect the SendCoreAsync method to be called passing in the
Notifymessage and an object array which contains the event that is going to be sent. - IHubClients: Allows to group clients based on a group name, this can be thought of as a topic with subscribed clients. The groupname subscribed to here is called
all. - IHubContext<EventsHub>: A SignalR hub, such as EventsHub, is the core abstraction for sending messages to clients connected to the SignalR server. IHubContext is another abstraction which allows to send notifications to those clients from outside the hub itself.
// mock signalr
var mockGroups = new Mock<IClientProxy>();
mockGroups.Setup(_ => _.SendCoreAsync("Notify", It.Is<object?[]>(o => o.Contains(bookingStarted)), It.IsAny<CancellationToken>())).Verifiable();

var mockClients = new Mock<IHubClients>();
mockClients.Setup(_ => _.Group("all")).Returns(mockGroups.Object).Verifiable();

Mock<IHubContext<EventsHub>> mockContext = new Mock<IHubContext<EventsHub>>();
mockContext.Setup(_ => _.Clients).Returns(mockClients.Object).Verifiable();
Next you pass in the mocked context into the NotifySeller constructor, to allow it to send message to clients subscribed to the hub.
var reaction = new NotifySeller(mockContext.Object);
And at the end of the test, you verify that all expectations have been met
// Then
mockClients.Verify();
mockGroups.Verify();
mockContext.Verify();
At this point your code doesn't compile yet, do let's implement the missing classes first.
Implement a hub
SignalR's core abstraction is called a Hub, and it requires you to implement a specific instance.
Right click on the OrderBooking.WebApi project in the Solution Explorer and choose Add > New Item.
In the Add New Item window select Class and name it EventsHub.cs.
For the purpose of making the test compile this EventsHub instance can be as simple as inheriting from Hub.
public class EventsHub : Hub
{

}
Implement the reaction class
Now you move on to the NotifySeller class.
Right click on the OrderBooking.WebApi project in the Solution Explorer and choose Add > New Item.
In the Add New Item window select Class and name it NotifySeller.cs.
First you pass the IHubContext<EventsHub> into the constructor and assign it to a local field.
Furthermore you implement the MessageHandler.EventSourcing.DomainModel.IChannel interface as agreed earlier.
public class NotifySeller : MessageHandler.EventSourcing.DomainModel.IChannel
{
    private readonly IHubContext<EventsHub> _context;

    public NotifySeller(IHubContext<EventsHub> context)
    {
        _context = context;
    }

    public Task Push(IEnumerable<SourcedEvent> events)
    {
        return Task.CompletedTask;
    }
}
The code compiles at this point, but when you run the test it will FAIL
That's because the Push implementation doesn't match the expectations yet.
Implement the Push method
To match these expectations, you iterate through the list of received events, and pass them into the SendAsync method of the all group, matching the Notify message.
public class NotifySeller : MessageHandler.EventSourcing.DomainModel.IChannel
{
    private readonly IHubContext<EventsHub> _context;

    public NotifySeller(IHubContext<EventsHub> context)
    {
        _context = context;
    }

    public Task Push(IEnumerable<SourcedEvent> events)
    {
        var tasks = new List<Task>();
        foreach (var e in events)
        {
            tasks.Add(_context.Clients.Group("all").SendAsync("Notify", e));
        }
        return Task.WhenAll(tasks);
    }
}
When you now run the tests again, they will SUCCEED
Hook the reaction to the aggregate
Now you know that the reaction works, and you hook it up to the OrderBooking aggregate, which is the source of the BookingStarted event.
You open the file Program.cs in OrderBooking.WebApi and locate the aggregate configuration, to extend it with EnableTransientChannel<NotifySeller>() in order to hook the reaction to all events emitted by the OrderBooking aggregate.
    into.Aggregate<OrderBooking.OrderBooking>()
        .EnableTransientChannel<NotifySeller>();
Exposing SignalR to the Seller UI
That's it from a MessageHandler perspective, the rest of the lesson will continue with exposing the SignalR Hub to a user interface for the seller.
In the interest of keeping this lesson a bit shorter, the remainder of the code will not be implemented using TDD. Refer to the SignalR specific documentation if you want to learn how to unit test these components.
Configure SignalR
You continue working in the Program.cs file in OrderBooking.WebApi, and add SignalR to the service collection.
builder.Services.AddSignalR();
Reconfigure CORS
SignalR does have specific CORS requirements when you want to allow another sub domain to interact with it.
Mainly you need to AllowCredentials, which in turn conflicts with AllowAnyOrigin, but you can work around this by setting a specific callback that validates whether the origin is allowed through SetIsOriginAllowed(hostName => true)
builder.Services.AddCors(options =>
{
    options.AddPolicy("AllowAll", policy =>
    {
        policy.AllowAnyMethod()
              .AllowAnyHeader()
              .AllowCredentials()
              .SetIsOriginAllowed(hostName => true);
    });
});
Expose the hub
To expose the hub on a given route, /events, you call MapHub.
app.MapHub<EventsHub>("/events");
Allow subscription on the hub
Previously you defined EventsHub as an empty Hub.
This means that no one would be subscribed to it by default, and the published messages would not arrive anywhere.
To fix this issue you provide any client a way to subscribe to the all group.
public class EventsHub : Hub
{
    public async Task Subscribe()
    {
        await Groups.AddToGroupAsync(Context.ConnectionId, "all");
    }
}
Implement the Seller UI
Next up is to create the seller UI itself, which is again a web UI similar to the buyer UI.
Add a project to hold the web UI
- Right click the Solution MessageHandler.LearningPath in the Solution Explorer and choose Add > New Project.
- Select the project template called ASP.NET Core Empty, tagged with C#. Click Next.
- Enter project name
OrderBooking.WebUI.Seller. Click Next. - Select framework .NET 8.0 (Long-term support). Click Create
Set the startup projects
Add the Seller UI to the startup projects, so that all UI's start when you launch the solution
- Right click the Solution MessageHandler.LearningPath in the Solution Explorer and choose Set Startup Projects.
- Select the Multiple startup projects radio button.
- Change the Action to
Startfor OrderBooking.WebUI.Seller - Click OK
Set up static file serving
This Web UI project will only serve as a web server to serve the html and javascript files that make up your web UI.
To configure your aspnet core web UI this way, navigate to program.cs and replace the code app.MapGet("/", () => "Hello World!"); by:
app.UseDefaultFiles();
app.UseStaticFiles();
Create folders and files
Now it's time to create the folders and files that make up the client side code of your web UI.
Aspnet core web UI only serves files from the wwwroot folder, all files and folders need to go in there.
Add wwwroot folder
- Right click on the OrderBooking.WebUI.Seller project in the Solution Explorer and choose Add > New Folder.
- Rename NewFolder to
wwwroot.
Add home page
- Right click on the wwwroot folder in the Solution Explorer and choose Add > New Item.
- In the Add New Item window select HTML PAGE and name it
index.html.
Add js folder
- Right click on the wwwroot folder in the Solution Explorer and choose Add > New Folder.
- Rename NewFolder to
js.
Add notifications script
- Right click on the js folder in the Solution Explorer and choose Add > New Item.
- In the Add New Item window select Javascript File and name it
notifications.js.
Expose the notification as a web component
To expose the notification as a webcomponent, navigate to notifications.js and add the following code.
class PurchaseOrderNotification extends HTMLElement {

}

customElements.define('purchase-order-notification', PurchaseOrderNotification);
This code defines a custom element, called PurchaseOrderNotification, which extends from HTMLElement.
Doing this, allows you to use your own HTML tag, <purchase-order-notification> in the home page, index.html directly in the folder wwwroot.
First import the script notifications.js as a module.
<head>
    <script src='/js/notifications.js' type="module"></script>
</head>
Then put your custom HTML tag in the body of the document.
<body>
    <purchase-order-notification></purchase-order-notification>
</body>
Implement the SignalR connection
Once your notification component is in place, you can make it interact with the SignalR hub through the SignalR client library.
First you make sure that this library is loaded from the cloudflare cdn.
<head>
    <script src="https://cdnjs.cloudflare.com/ajax/libs/microsoft-signalr/6.0.1/signalr.js"></script>
    <script src='/js/notifications.js' type="module"></script>
</head>
Once the library is loaded you can configure a connection to the hub using the HubConnectionBuilder and point the connection to the /events route mapped to EventsHub in the web api.
When the connection is configured it can be established by calling start.
Assuming the connection is establised, you can register a callback on the Notify message, and call render in response.
The message will only be sent to all clients subscribed in the all group.
To get this connection added to that group you invoke the Subscribe method on the hub.
class PurchaseOrderNotification extends HTMLElement {

    constructor() {
        super();
    }

    async connectedCallback() {

        this.connection = new signalR.HubConnectionBuilder()
            .withUrl("https://localhost:7100/events")
            .configureLogging(signalR.LogLevel.Information)
            .build();

        this.connection.onclose(async () => {
            await this.start();
        });
        await this.start();

        this.connection.on("Notify", (event) => {
            if (event.purchaseOrder) {
                this.toast.innerHTML = `A new purchase order is available for approval. <a href=".">refresh</a>`;
            }
            this.render();
        });

        await this.connection.invoke("Subscribe");
    }

    async start() {
        try {
            await this.connection.start();
        } catch (err) {
            console.log(err);
        }
    }

    render() {

    }

}
Style toast notification
The notification is now fully functional, albeit a bit ugly.
In this final step you make it look better by popping up as a toast at the bottom of the home page.
After 10 seconds it will also be removed again.
class PurchaseOrderNotification extends HTMLElement {

    constructor() {
        super();

        const shadow = this.attachShadow({ mode: "open" });
        this.toast = document.createElement("span");
        this.toast.setAttribute("class", "toast");
        shadow.appendChild(this.toast);
    }

    render() {
        this.toast.classList.add("show");
        setTimeout(() => this.toast.classList.remove("show"), 10000);
    }
}
Now you add some fancy transition css to make it look great, fade in and fade out after 9.5 seconds as well.
class PurchaseOrderNotification extends HTMLElement {

    constructor() {
        super();

        const shadow = this.attachShadow({ mode: "open" });

        let style = document.createElement("style");
        style.textContent = `
            .toast {
              visibility: hidden;
              min-width: 250px;
              margin-left: -125px;
              background-color: #333;
              color: #fff;
              text-align: center;
              border-radius: 2px;
              padding: 16px;
              position: fixed;
              z-index: 1;
              left: 50%;
              bottom: 30px;
            }

            .toast a {
              color: #fff;
            }

            .toast.show {
              visibility: visible;
              -webkit-animation: fadein 0.5s, fadeout 0.5s 9.5s;
              animation: fadein 0.5s, fadeout 0.5s 9.5s;
            }

            @-webkit-keyframes fadein {
              from {bottom: 0; opacity: 0;}
              to {bottom: 30px; opacity: 1;}
            }

            @keyframes fadein {
              from {bottom: 0; opacity: 0;}
              to {bottom: 30px; opacity: 1;}
            }

            @-webkit-keyframes fadeout {
              from {bottom: 30px; opacity: 1;}
              to {bottom: 0; opacity: 0;}
            }

            @keyframes fadeout {
              from {bottom: 30px; opacity: 1;}
              to {bottom: 0; opacity: 0;}
            }`;
        shadow.appendChild(style);

        this.toast = document.createElement("span");
        this.toast.setAttribute("class", "toast");
        shadow.appendChild(this.toast);
    }

    render() {
        this.toast.classList.add("show");
        setTimeout(() => this.toast.classList.remove("show"), 10000);
    }
}
Congratulations! You made it to the end of lesson 8.
Hit F5 on the solution, enter a new purchase order in the buyer UI and behold your toast notification appears in the seller UI.
The code created up until now can also be found in the 07 transient reaction folder of the reference repository.
Summary
In this lesson you learned how to build a transient reaction, a very common processing patterns used to perform best effort attempts such as notifications.
What’s coming next?
Not all reactions can be considered 'best effort' though, some do need to be executed and require delivery guarantees.
In the next lesson of this tutorial, you’ll set up the infrastructure to guarantee the delivery of events, so that your system can ensure reactions will happen (eventually).