Introduction
In this lesson, you'll learn how to leverage guaranteed delivery in combination with a projection, to achieve polyglot persistence.
Polyglot persistence is essentially the idea that an application can use more than one database or storage technology, so that you can make use of the right technology for each use case.
In lesson 5 you already learned how to set up persistence using azure table storage.
By the end of this lesson, you will:
- Have projected event carried state into an Azure Search index as well
- Learned how to identify the need for polyglot peristence in an event model
- Understand how you can keep multiple databases synchronized while respecting the need for atomicity
Identifying the need for polyglot persistence
You can identify the need for polyglot persistence by looking at your event model.
When there are multiple projections, where data has different query needs, you'll likely benefit from using multiple databases to facilitate those queries.
In our e-commerce process, the seller needs an overview of all pending sales orders, while the buyer only wants to see the status of their own booking.
Both sets of data are a consequences of the same BookingStarted event, but their querying needs are very different, one needs searching and filtering, the other direct access.
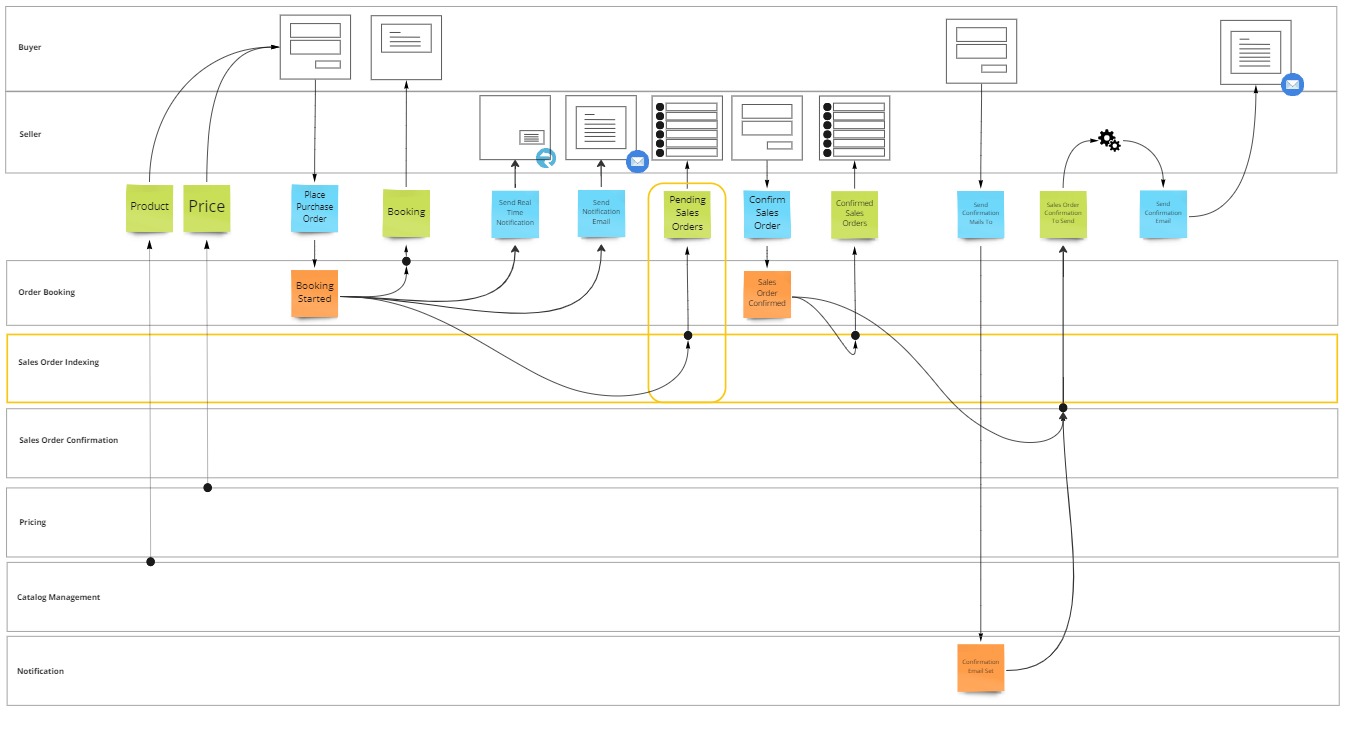
In this lesson you'll implement a projection which will occur when BookingStarted, then the system will store the projected state into an Azure Search index.
Achieving polyglot persistence while maintaining atomicity
Microsoft Azure is an environment with little to no transaction support.
Maintaining data consistency across different services and data stores can become quite a challenge in such an environment.
When trying to update multiple datasources in a single unit of work, a partial failure of any of theses updates, will expontentially increase the complexity of the failure modes on all of the other updates happening in that same call.
Therefore, to ensure data consistency in a distributed system, without transactions, each unit of work must be atomic, retriable and idempotent instead.
These characteristics can be achieved by hooking up individual projections through their own atomic processing pipeline, as shown in the example below.
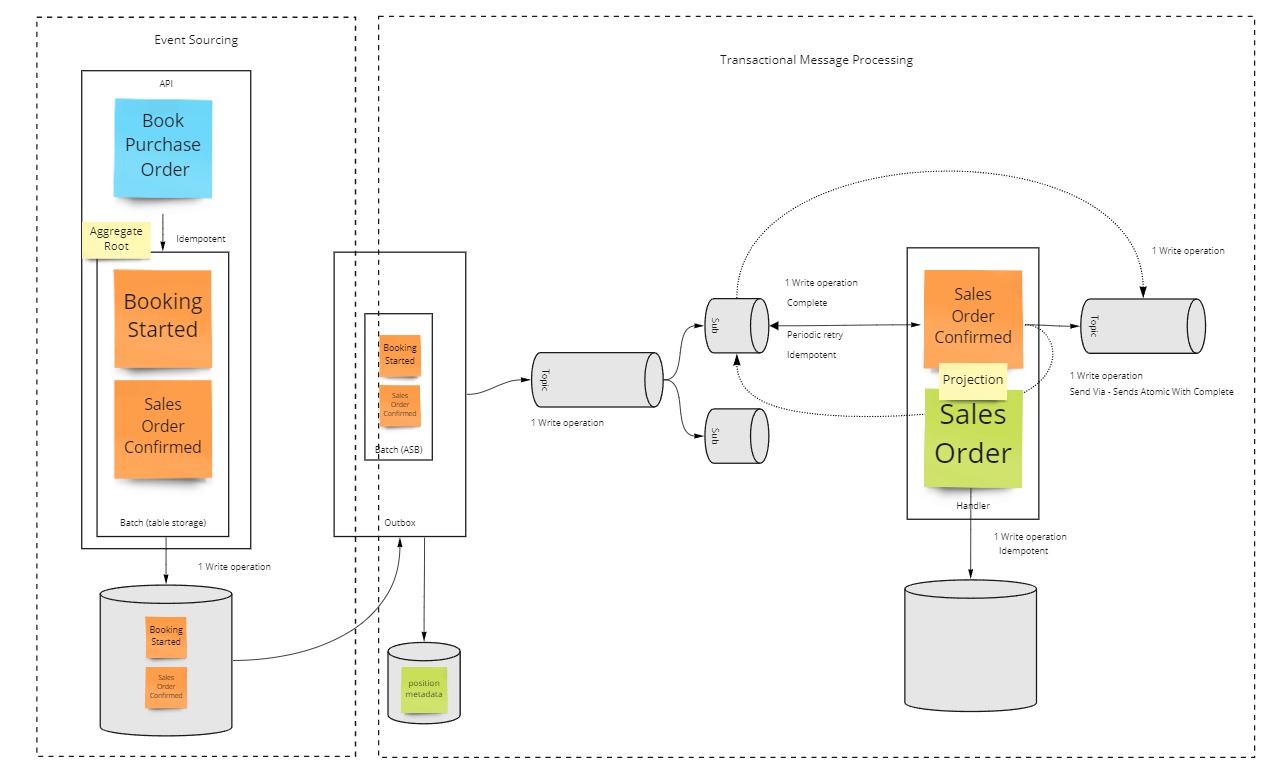
Now, this is a fairly lenghty topic in its own right, check out the corresponding explanation section if you want to get more context more about how this works, but over the course of this lesson you will already learn configure this setup.
Implementing polyglot persistence
Implementing polyglot persistence, is in the end very similar to implementing a guaranteed reaction. Yet, instead of invoking an action, you invoke a projection and store the result of said projection.
Note: you can pick up the codebase from where you left it last time, it's in 08 guaranteed delivery of the learning path reference repository.
Extend the worker service
As the projection has to be guaranteed, it is best to run it in a host that is always running as well, such as the worker service.
Now you will extend this worker to support both projections, and indexing to azure search.
Add a package reference to MessageHandler.EventSourcing.AzureTableStorage
- Right click on Dependencies of the OrderBooking.Worker project in the Solution Explorer and choose Manage Nuget Packages.
- In the Nuget Package Manager window, browse for
MessageHandler.EventSourcing.AzureTableStorage. - Select the latest version and click Install.
- Click I Accept in the License Acceptance window.
Add a package reference to Azure.Search.Documents
- Right click on Dependencies of the OrderBooking.Worker project in the Solution Explorer and choose Manage Nuget Packages.
- In the Nuget Package Manager window, browse for
Azure.Search.Documents. - Select the latest version and click Install.
- Click I Accept in the License Acceptance window.
Manage User Secrets
In lesson 1 of this tutorial, you should already have set up an azure search instance.
Now it is time to configure the endpoint and api key values in your user secrets file to connect to this instance later in this lesson.
Next to the azure search configuration, you will also need to set the azure table storage connectionstring as you will configure the event sourcing runtime as well.
Right-click on the OrderBooking.Worker project in the Solution Explorer and choosing Manage User Secrets.
Visual Studio will now open your personal user secrets file associated to the project.
Modify the json content of the secrets file to include the SearchEndpoint, SearchApiKey and TableStorageConnectionString properties with the correct values.
{
    "SearchEndpoint": "https://your.search.windows.net",
    "SearchApiKey": "YourApiKeyGoesHere",
    "TableStorageConnectionString": "YourConnectionStringGoesHere"
}
Define search model
Azure search maintains an index which is easily searchable, filterable and sortable. But in order to do so, it needs to know which data needs to be searchable, filterable or sortable.
Even though it is possible to manually set up this index, it is easier to do it via code, by annotating a data schema class.
You add a file called SalesOrder.cs and define the SalesOrder index structure inside of it.
public class SalesOrder
{
    [SimpleField(IsKey = true, IsFilterable = true)]
    public string Id { get; set; } = string.Empty;

    [SearchableField(IsFilterable = true, IsSortable = true)]
    public string Name { get; set; } = string.Empty;

    [SimpleField(IsFilterable = true, IsSortable = true)]
    public string Status { get; set; } = string.Empty;

    [SimpleField(IsSortable = true)]
    public int Amount { get; set; }
}
Auto create the index
To create the index, you use the SearchIndexClient class available in the Azure.Search.Documents.Indexes namespace.
To call it when the worker starts up, you first implement a class called AutoCreateIndex, which implements IHostedService.
This interface defines a StartAsync and StopAsync which you can implement to perform tasks on startup, respectively on gracefull shutdown, of the hosting process.
On startup you call GetIndexAsync in order to determine if the index already exists.
Note: depending on the SDK version, you may run into an RequestFailedException if it doesn't, or the Value property of the response object may be null.
If it doesn't exist, you'll first create the schema based on the SalesOrder schema annotations, by using the FieldBuilder class found in the Azure.Search.Documents.Indexes.Models namespace.
Then you'll create an new instance of SearchIndex providing the index name and schema.
Eventually you'll call CreateOrUpdateIndexAsync to create the index.
public class AutoCreateIndex : IHostedService
{
    private readonly SearchIndexClient indexClient;

    public AutoCreateIndex(SearchIndexClient indexClient)
    {
        this.indexClient = indexClient;
    }

    public async Task StartAsync(CancellationToken cancellationToken)
    {
        var indexName = "salesorders";

        Response<SearchIndex> response = null!;
        try
        {
            response = await indexClient.GetIndexAsync(indexName);
        }
        catch (Azure.RequestFailedException) { }

        if (response == null || response.Value == null)
        {
            FieldBuilder fieldBuilder = new();
            var searchFields = fieldBuilder.Build(typeof(SalesOrder));

            var index = new SearchIndex(indexName, searchFields);

            await indexClient.CreateOrUpdateIndexAsync(index);
        }
    }

    public Task StopAsync(CancellationToken cancellationToken)
    {
        return Task.CompletedTask;
    }
}
Configure search
The AutoCreateIndex index class needs to be added to the hosts service collection using the AddHostedService method in order to be automatically called on startup.
As this class also has a dependency on SearchIndexClient, you'll add a configured instance of it to the container as well.
Likewise, you already add a SearchClient index to the collection, which will allow you to query the schema for existing records.
public static class Search
{
    public static IServiceCollection AddSearch(this IServiceCollection services, string endpoint, string apiKey)
    {
        var searchClient = new SearchClient(new Uri(endpoint), "salesorders", new AzureKeyCredential(apiKey));
        var indexClient = new SearchIndexClient(new Uri(endpoint), new AzureKeyCredential(apiKey));

        services.AddSingleton(searchClient);
        services.AddSingleton(indexClient);

        services.AddHostedService<AutoCreateIndex>();

        return services;
    }
}
In program.cs you first load the SearchEndpoint and SearchApiKey configuration values from user secrets.
And pass them into the AddSearch extension method.
var searchEndpoint = hostContext.Configuration.GetValue<string>("SearchEndpoint") ?? throw new Exception("No 'SearchEndpoint' connection string was provided. Use User Secrets or specify via environment variable.");
var apiKey = hostContext.Configuration.GetValue<string>("SearchApiKey") ?? throw new Exception("No 'azuresearchapikey' connection string was provided. Use User Secrets or specify via environment variable.");

services.AddSearch(searchEndpoint, apiKey);
Define the projection
Now that you have a destination to project into, it is time to build the actual projection.
As you have done this before in lesson 4, the code should be pretty familiar.
You project from the BookingStarted event, into the SalesOrder model, by implementing the IProjection interface.
In the implementation of the Project method you copy over the data from the event into the state, or set the data to a wellknown value.
You repeat this for the SalesOrderConfirmed event.
public class ProjectToSearch :
    IProjection<SalesOrder, BookingStarted>,
    IProjection<SalesOrder, SalesOrderConfirmed>
{
    public void Project(SalesOrder salesOrder, BookingStarted msg)
    {
        salesOrder.Name = msg.Name;
        salesOrder.Amount = msg.PurchaseOrder?.Amount ?? 0;
        salesOrder.Status = "Pending";
    }

    public void Project(SalesOrder salesOrder, SalesOrderConfirmed msg)
    {
        salesOrder.Status = "Confirmed";
    }
}
In program.cs, inside the AddMessageHandler configuration method, you add EventSourcing to the runtimeConfiguration, so that you can start to Stream events into the ProjectToSearch projection from azure table storage, or from a handler.
var storageConnectionString = hostContext.Configuration.GetValue<string>("TableStorageConnectionString") ?? throw new Exception("No 'TableStorageConnectionString' was provided. Use User Secrets or specify via environment variable.");

runtimeConfiguration.EventSourcing(source =>
{
    source.Stream("OrderBooking",
        from => from.AzureTableStorage(storageConnectionString, "OrderBooking"),
        into => into.Projection<ProjectToSearch>());
});
Invoke the projection in response to an incoming event
Next step you take is to invoke the projection whenever a BookingStarted event is received.
You do so by building a handler, called IndexSalesOrder, which implements IHandle<BookingStarted>.
The handler has a dependency on a projection invoker, IInvokeProjections<SalesOrder> and on the SearchClient in order to interact with the Azure Search index.
In the Handle method, the indexer will first get any existing sales order from the search index or create a new instance if it doesn't exist yet.
Then it passes the instance into the projection to populate its data structure with information from the event.
And finally it will persist the projected data into the azure search index.
public class IndexSalesOrder : IHandle<BookingStarted>
{
    private readonly SearchClient _client;
    private readonly IInvokeProjections<SalesOrder> _projection;
    private readonly ILogger<IndexSalesOrder> _logger;

    public IndexSalesOrder(IInvokeProjections<SalesOrder> projection, SearchClient client, ILogger<IndexSalesOrder> logger = null!)
    {
        _client = client;
        _projection = projection;
        _logger = logger;
    }

    public async Task Handle(BookingStarted message, IHandlerContext context)
    {
        _logger?.LogInformation("Received BookingStarted, indexing the sales order...");

        var salesOrder = await _client.GetOrCreateSalesOrder(message.BookingReference);

        _projection.Invoke(salesOrder, message);

        await _client.Persist(salesOrder);

        _logger?.LogInformation("Sales order indexed");
    }
}
The GetOrCreateSalesOrder and Persist methods are not part of the Azure Search SDK, instead they are extension methods to make it easier to use the SDK.
GetOrCreateSalesOrder is calling GetDocumentAsync under the hood, and if the document is not found, it will construct a new one.
Persist is a wrapper around MergeOrUploadDocumentsAsync which accepts and array of documents to upload.
public static class SearchClientExtensions
{
    public static async Task<SalesOrder> GetOrCreateSalesOrder(this SearchClient client, string orderId)
    {
        var order = default(SalesOrder);
        try
        {
            order = await client.GetDocumentAsync<SalesOrder>(orderId);
        }
        catch (RequestFailedException ex)
        {
            if (ex.Status == 404)
            {
                order = new SalesOrder() { Id = orderId };
            }
        }
        return order!;
    }

    public static async Task Persist(this SearchClient client, SalesOrder salesOrder)
    {
        await client.MergeOrUploadDocumentsAsync(new[] { salesOrder });
    }
}
In program.cs, inside the AddMessageHandler configuration method, you add another atomic processing pipeline.
This processing pipeline will pull messages from an orderbooking.indexing subscription and handle these messages with the IndexSalesOrder handler.
It is important that this processing pipeline is completely separated from the already existing pipeline used to send email notifications, to ensure both handle the BookingStarted events independently from each other.
runtimeConfiguration.AtomicProcessingPipeline(pipeline =>
{
    pipeline.PullMessagesFrom(p => p.Topic(name: "orderbooking.events", subscription: "orderbooking.indexing", serviceBusConnectionString));
    pipeline.DetectTypesInAssembly(typeof(BookingStarted).Assembly);
    pipeline.HandleMessagesWith<IndexSalesOrder>();
});
Create the subscription
In lesson 9 you have already set up the orderbooking.events topic.
Now you will extend it with a second subscription, called orderbooking.indexing, from which the pipeline configured above is going to pull.
Open Azure Service Bus Explorer, click File > Connect.
Choose **Enter connection string" and paste your connection string in the connection string form field.
Click OK.
Right-click on orderbooking.events in the Topics treeview and select Create Subscription.
In the Subscription Name field, enter orderbooking.indexing.
Click Create.
Test the solution
You made it to the end of lesson 10.
Hit F5 on the solution, enter another purchase order in the buyer UI to see a new record being added to the azure search index.
The code created up until now can also be found in the 09 polyglot persistence folder of the reference repository.
Summary
In this lesson you learned how to leverage guaranteed delivery in combination with a projection, to achieve polyglot persistence.
What’s coming next?
In the next lesson of this tutorial, you’ll learn how to use projected data as input for manual task processing.