Introduction
In this lesson, you'll implement another Reaction pattern.
But, in contrast to the previous lesson, this reaction will be guaranteed to execute.
By the end of this lesson, you will:
- Understand what the responsibility of a reaction is.
- Be able to identify the pattern from an Event Model.
- Learn how you can guarantee that a reaction will (eventually) execute.
- Have built, and tested, a guaranteed implementation of the pattern using MessageHandler.
What is a reaction
A reaction responds to an occurance of an event by invoking a command.
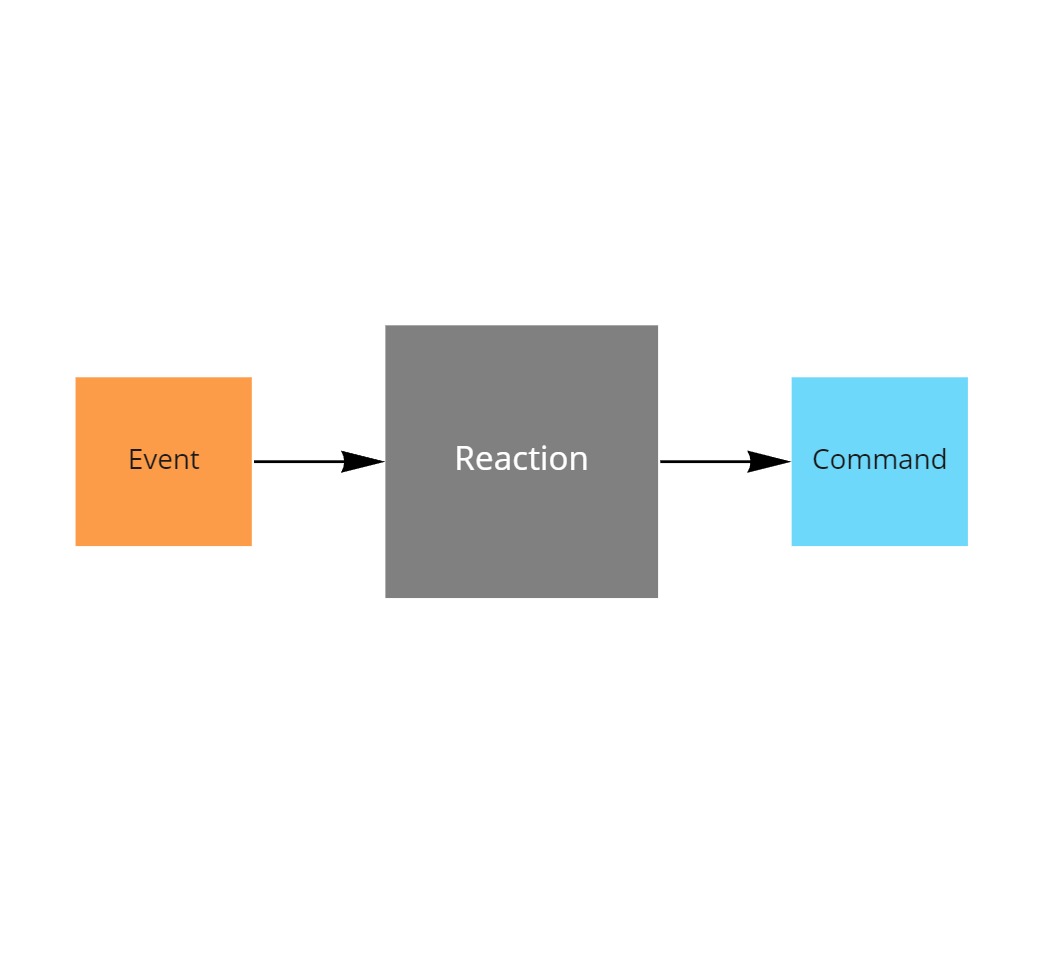
For a reaction to become guaranteed, the event, leading up to the reaction, must be delivered by a durable transport which has either transaction support or has another retry mechanism built in.
Identifying reactions
To identify a reaction in an Event Model, you search for the transitions between events (orange post-it) and commands (blue post-it).
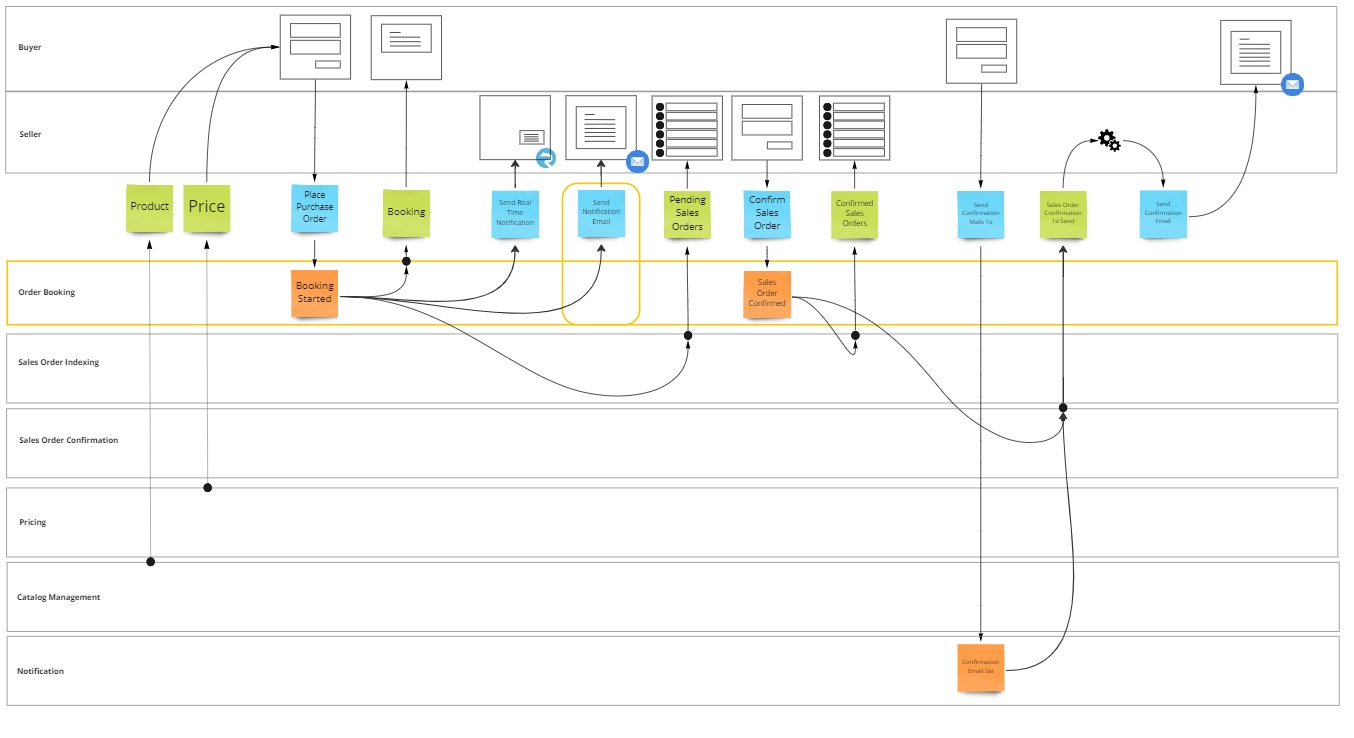
In this lesson you'll implement a reaction which will occure when BookingStarted, then the system will send an email to the seller (at least once).
At least once delivery
To guarantee delivery of an event, the messaging transport used to deliver it must implement at least once delivery.
In Azure the natural choice for such a transport would be Azure Service Bus.
Azure Service Bus supports at least once delivery through a retry mechanism, called peek-lock.
This means that a message, which gets received from a queue or subscription is merely locked for a while and not really removed from the receiving entity upon receive. It is the receiving code which has to confirm that processing of the message completed to effectively remove it.
In case processing would fail, or does not complete within the allotted timeframe, the message will be released and appear on the entity again.
Note that at least once does also imply that a message can also be received more than once if the receiving code fails to confirm it in time.
In lesson 1 of the tutorial, you should have set up an Azure Service Bus namespace, be sure to grab the connectionstring towards that namespace before starting this lesson. You'll need it now.
Implementing the reaction pattern
Just like you did for the Aggregate Root and Projection patterns, you're going to implement the reaction using TDD.
You can pick up the codebase from where you left off last time, it's in 07 transient reaction of the learning path reference repository.
Given that reactions often interact with infrastructure, such as the email service Postmark in this case, the implementation belongs in the application layer and not in the domain layer.
To test a reaction, you will need to ensure the interaction between the reaction and this infrastructure is tested as well, using component tests while mocking out any dependencies.
But before you begin the implementation, let's add another extension to the project system which will host the process that is running this reaction.
As the reaction has to be guaranteed, it is best to run it in a host that is always running as well, such as a worker service.
Add a project to hold the worker service
- Right click the Solution MessageHandler.LearningPath in the Solution Explorer and choose Add > New Project.
- Select the project template called Worker Service, tagged with C#. Click Next.
- Enter project name
OrderBooking.Worker. Click Next. - Select framework .NET 8.0 (Long-term support). Click Create
Delete the pregenerated file Worker.cs, and remove the code in Program.cs which registers the default worker in the service collection.
// services.AddHostedService<Worker>();
Add a package reference to MessageHandler.Runtime.AtomicProcessing
- Right click on Dependencies of the OrderBooking.Worker project in the Solution Explorer and choose Manage Nuget Packages.
- In the Nuget Package Manager window, browse for
MessageHandler.Runtime.AtomicProcessing. - Select the latest version and click Install.
- Click I Accept in the License Acceptance window.
Add a package reference to Postmark
- Right click on Dependencies of the OrderBooking.Worker project in the Solution Explorer and choose Manage Nuget Packages.
- In the Nuget Package Manager window, browse for
Postmark. - Select the latest version and click Install.
- Click I Accept in the License Acceptance window.
Add a package reference to Microsoft.Extensions.Configuration.UserSecrets
- Right click on Dependencies of the OrderBooking.Worker project in the Solution Explorer and choose Manage Nuget Packages.
- In the Nuget Package Manager window, browse for
Microsoft.Extensions.Configuration.UserSecrets. - Select the latest version and click Install.
- Click I Accept in the License Acceptance window.
Writing a component test
You navigate to WhenReactingToBookingStarted.cs in OrderBooking.ComponentTests and add a method to it that describes the scenario GivenBookingStarted_WhenNotifyingTheSeller_ShouldSendAnEmailToTheSeller
public class WhenReactingToBookingStarted
{
    [Fact]
    public async Task GivenBookingStarted_WhenNotifyingTheSeller_ShouldSendAnEmailToTheSeller()
    {

    }
}
Once the skeleton is in place, you add code to it to reflect the scenario.
You start by outlining that a BookingStarted event is given, when notifying the seller of this event, then you expect an email to be sent.
You also assume that the SendNotificationMail reaction will implement the MessageHandler.Runtime.AtomicProcessing.IHandle interface, which is used to handle messages coming from a transport that provides guaranteed delivery.
public class WhenReactingToBookingStarted
{
    [Fact]
    public async Task GivenBookingStarted_WhenNotifyingTheSeller_ShouldSendAnEmailToTheSeller()
    {
        // given
        var bookingStarted = new BookingStarted();

        // todo: mock email

        //when
        var reaction = new SendNotificationMail(/* todo, inject mock */);
        await reaction.Handle(bookingStarted, null);

        // Then: todo verify mock was called
    }
}
To send the actual email, you will be using the Postmark SDK. The problem with many third party SDKs, Postmark included, is that they have not been designed to be used in unit tests.
To overcome this limitation, you'll implement a small abstraction which will act as a wrapper around this SDK. The ISendEmails interface represents this abstraction.
public interface ISendEmails
{
    Task SendAsync(string from, string to, string subject, string body);
}
This interface can now be mocked, and interaction with it verified, using moq.
public class WhenReactingToBookingStarted
{
    [Fact]
    public async Task GivenBookingStarted_WhenNotifyingTheSeller_ShouldSendAnEmailToTheSeller()
    {
        // given
        var bookingStarted = new BookingStarted();

        // mock email
        var mockEmailSender = new Mock<ISendEmails>();
        mockEmailSender.Setup(_ => _.SendAsync("sender@seller.com", "seller@seller.com", "New purchase order", "A new purchase order is available for approval")).Verifiable();

        //when
        var reaction = new SendNotificationMail(mockEmailSender.Object);
        await reaction.Handle(bookingStarted, null);

        // Then
        mockEmailSender.Verify();
    }
}
At this point your code doesn't compile yet, let's implement the missing classes first.
Implement the reaction
Implementing the reaction, using the ISendEmails interface as a dependency, is pretty straight forward as all you will do is invoke the command SendAsync when the BookingStarted event is handled.
public class SendNotificationMail : IHandle<BookingStarted>
{
    private readonly ISendEmails emailSender;

    public SendNotificationMail(ISendEmails emailSender)
    {
        this.emailSender = emailSender;
    }

    public async Task Handle(BookingStarted message, IHandlerContext context)
    {
        await emailSender.SendAsync("sender@seller.com", "seller@seller.com", "New purchase order", "A new purchase order is available for approval");
    }
}
At this point your test will already succeed as all you did was verify the interaction with the abstraction.
But to actually send out the email, you will need to implement a specific email sending service such as Postmark.
Implement the send email abstraction
To test the Postmark specific implementation, you should create an integration test, but given there is nothing MessageHandler specific about this, and we want to keep the length of this lesson manageable, we will just move forward and show the implementation only.
The PostmarkClient class is the workhorse of the Postmark SDK, it requires a server token to identify your Postmark account.
You use the client to send a PostmarkMessage with the SendMessageAsync function.
public class PostmarkEmailSender : ISendEmails
{
    private string serverToken;

    public PostmarkEmailSender(string serverToken)
    {
        this.serverToken = serverToken;
    }

    public async Task SendAsync(string from, string to, string subject, string body)
    {
        var email = new PostmarkMessage()
        {
            From = from,
            To = to,
            Subject = subject,
            HtmlBody = body,
            TextBody = body
        };

        var client = new PostmarkClient(this.serverToken);
        await client.SendMessageAsync(email);
    }
}
To configure the PostmarkEmailSender class, you add an extension method on IServiceCollection to configure the instance.
Configuration requires you to pass in the server token of your postmark account.
In case you don't have an account yet, you can also use the POSTMARK_API_TEST server token, which will send any email to a test server.
public static class Postmark
{
    public static void AddPostmark(this IServiceCollection services)
    {
        services.AddSingleton<ISendEmails>(new PostmarkEmailSender("POSTMARK_API_TEST"));
    }
}
You call this extension method from Program.cs.
using OrderBooking.Worker;

IHost host = Host.CreateDefaultBuilder(args)
    .ConfigureServices((hostContext, services) =>
    {

        services.AddPostmark();

    })
    .Build();

await host.RunAsync();
Setting up guaranteed delivery
All processing code is now in place, and it is time to set up the transport for guaranteed delivery of the events.
These events originate from the Aggregate Root, hosted in the Web Api, and should be published towards the Reaction, hosted in the Worker.
In Azure, a transport very suitable for this purpose is Azure Service Bus, which requires a connection string.
You will now configure your user secrets with the ServiceBusConnectionString value on both these hosting projects.
Configure OrderBooking.WebApi
Right-click on the OrderBooking.WebApi project in the Solution Explorer and choosing Manage User Secrets.
Visual Studio will now open your personal user secrets file associated to the Web API project.
Modify the json content of the secrets file to include a ServiceBusConnectionString property that has the connection string as a value.
{
  "ServiceBusConnectionString": "YourConnectionStringGoesHere"
}
Configure OrderBooking.Worker
Right-click on the OrderBooking.Worker project in the Solution Explorer and choosing Manage User Secrets.
Visual Studio will now open your personal user secrets file associated to the Worker project.
Modify the json content of the secrets file to include a ServiceBusConnectionString property that has the connection string as a value.
{
  "ServiceBusConnectionString": "YourConnectionStringGoesHere"
}
Create the Azure Service Bus entities
In lesson 1 you have downloaded Azure Service Bus explorer, which is a tool to manage your Azure Service Bus namespace.
Now you will use this too to create a topic, for the Aggregate Root to publish to, and a subscription, for the reaction to pull from.
Open Azure Service Bus Explorer, click File > Connect.
Choose **Enter connection string" and paste your connection string in the connection string form field.
Click OK.
Right-click on Topics and select Create Topic.
In the Relative Uri field, enter orderbooking.events.
Click Create.
Right-click on orderbooking.events in the Topics treeview and select Create Subscription.
In the Subscription Name field, enter orderbooking.worker.
Click Create.
Pump messages from the Aggregate Root into the topic
When the topic has been created, you configure the Web Api project to enable the outbox.
The outbox is a message pump which will transfer messages from the underlying event store to the destination transport.
First add a package reference to MessageHandler.EventSourcing.Outbox
- Right click on Dependencies of the OrderBooking.WebApi project in the Solution Explorer and choose Manage Nuget Packages.
- In the Nuget Package Manager window, browse for
MessageHandler.EventSourcing.Outbox. - Select the latest version (include prerelease) and click Install.
- Click I Accept in the License Acceptance window.
Then enable the outbox on the OrderBooking aggregate, in Program.cs of the Web Api, and configure it to route messages towards the orderbooking.events topic.
into.Aggregate<OrderBooking.OrderBooking>()
    .EnableTransientChannel<NotifySeller>()
    .EnableOutbox("OrderBooking", "orderbooking.webapi", pipeline =>
    {
        pipeline.RouteMessages(to => to.Topic("orderbooking.events", serviceBusConnectionString));
    });
Pull messages from the subscription into the reaction
Once the messages are being routed towards the orderbooking.events topic, the worker can start pulling messages from the orderbooking.worker subscription.
You can do so by enabling the AtomicProcessingPipeline on the runtime configuration, and configure the pipeline to pull from orderbooking.events, using the orderbooking.worker subscription.
You also configure which messages to detect, those in the assembly containing BookingStarted, and tell it to handle messages with the SendNotificationMail handler.
runtimeConfiguration.AtomicProcessingPipeline(pipeline =>
{
    pipeline.PullMessagesFrom(p => p.Topic(name: "orderbooking.events", subscription: "orderbooking.worker", serviceBusConnectionString));
    pipeline.DetectTypesInAssembly(typeof(BookingStarted).Assembly);
    pipeline.HandleMessagesWith<SendNotificationMail>();
});
Add logging
The hosting projects are now ready to operate, but for convenience reasons you add some logging to the Reaction to show what it is doing.
public class SendNotificationMail : IHandle<BookingStarted>
{
    private readonly ILogger<SendNotificationMail> logger;
    private readonly ISendEmails emailSender;

    public SendNotificationMail(ISendEmails emailSender, ILogger<SendNotificationMail> logger = null)
    {
        this.logger = logger;
        this.emailSender = emailSender;
    }

    public async Task Handle(BookingStarted message, IHandlerContext context)
    {
        logger?.LogInformation("Received BookingStarted, sending notification mail...");

        await emailSender.SendAsync("sender@seller.com", "seller@seller.com", "New purchase order", "A new purchase order is available for approval");

        logger?.LogInformation("Notification email sent");
    }
}
You also add the logging infrastructure, as none is added by default in the worker process.
services.AddLogging();
Test the solution
There you are! You made it to the end of lesson 9.
Hit F5 on the solution, enter a new purchase order in the buyer UI to see the notification email being sent to the seller.
The code created up until now can also be found in the 08 guaranteed delivery folder of the reference repository.
Summary
In this lesson you learned how to guarantee delivery of events, so that a reaction will eventually be executed.
What’s coming next?
In the next lesson of this tutorial, you’ll learn how to use this same technique to achieve polyglot persistence, while ensuring that each data store eventually gets updated.